I really enjoyed creating a free training for you all about growing an audience to increase your sales on Amazon FBA. This training is going to show you a few things. The first is of course building an email list, which I still believe to be one of the most important assets you can do for you business. The second is creating a landing page to get your ideal customer to give you their email address in exchange for something that solves the problem they are having. Finally, I will teach you how to drive low cost traffic to this page. This whole process is incredibly simple and should take only a few days to set up and start implementing.
Let’s start with step 1, which is planning the whole process to have a nice clean checklist in order to know what to do next. This blog posts and videos can also serve as an SOP (standard operating procedure) to give to your team in order for them to do it, so bookmark this page.
Also, full disclaimer, some of the links contained in this article are affiliate links, so we are paid when you use the software and products IF you click through our link. This is how I keep all this training absolutely free and always will as long as you purchase the software through those links.
With that being said, I 100% use everything I recommend in this training. I love the software and will continue to use it well into the future.
Planning
Whenever you are going to start a new project, one of the biggest things to do is sit down with a sheet of blank paper and plan out every step of the process. I had a mentor of mine who once said that you should start the year with three notebooks.
Each notebook represents one goal that you want to achieve for the year. Write that one goal on the cover. Next write the 500 steps needed to get to your goal and 10 challenges that will prevent you from getting to your goal. Now get to work on achieving those three goals and work on nothing else.
This is the power of goal setting, planning, and focus.
There are two lessons in this. First is finding your one thing to focus on to make everything else easier and unnecessary, and the second is perseverance to focus on this one thing.
With an Amazon business, this one thing is an audience and that is what I am going to be teaching you in this free training. You should wake up every day thinking about how you are going to BUILD AND SERVE your audience.

Steps to Build Your Audience to Increase Your Amazon Sales
- Plan what you are going to do
- Determine what to give away for free in exchange for an email address (handout, book, coupon code, etc.)
- Create the giveaway (have it made for you with Fiverr.com, create it yourself, create the coupon, etc.)
- Create a List inside Klaviyo
- Create a Flow inside Klaviyo
- Create a Landing Page inside Zipify pages (on Shopify)
- Create a Thank You Page inside Zipify Pages (on Shopify)
- Connect Landing Page, Flow, List, and Thank you page inside Zipify pages (on Shopify)
- Add an Exit Intent Pop-Up using Optimonk
- Driving Traffic with Google Ads or Facebook Ads
Determine what to give away for free in exchange for an email address
Giving something to someone in return for their email address may not seem like a very personal decision for us, because we are in the internet marketing world, but to your audience it is VERY personable. Whatever you decide to give them, whether it be a listicle, book, coupon, etc. has to be ten times the value of them giving you their email address. Let’s break a few options down to determine which is best for you.
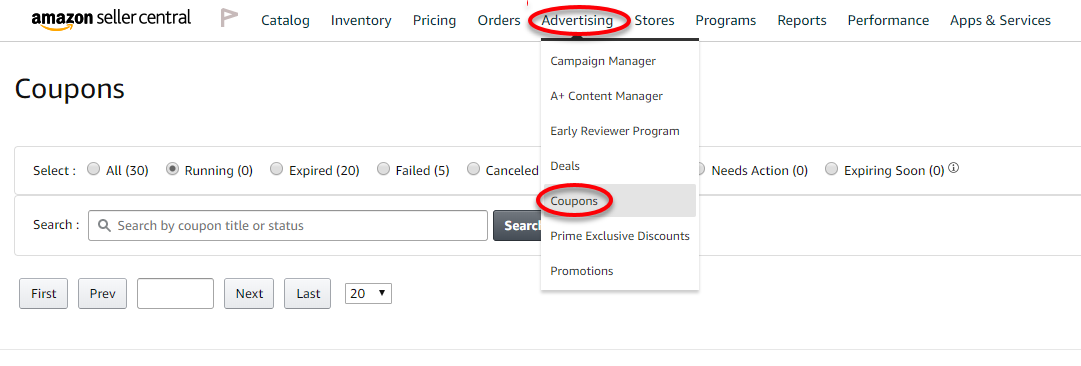
A Coupon
Amazon has a few different ways to make a coupon, and I prefer the clipped coupon now versus the promotion code because it seems to be more easily controlled. The object of value is the discount that they are receiving as a result of giving up their email address so it has to be worth a lot. I recommend going all the way up to 50% on this, if not higher.
A Book
This one is pretty self explanatory. Give away a book that solves the PROBLEM that your product solves or that solves a problem that your ideal customer has. We wrote a 200 page book called Rethinking Dry Eye Treatment that you can purchase an Audible, Kindle, or in Paperback. We give a PDF version of this book away for free in exchange for an email address.
Your book does not have to be a 200 page book, and could be as short as 10 pages with pictures. Keep it simple, and in your book be sure to mention your product or products as being a solution to this problem. You can hire someone on Fiverr.com to do this for you.
Here is our example landing page for our Rethinking Dry Eye Treatment PDF book.

A Handout
A handout can be a simple one-page PDF that again SOLVES THE PROBLEM that your product solves. Do you see a trend with all these? Your customer has a problem and they are looking to solve it. Address the problem first and then give them the solution, which is your product.
An example of this would be that a lot of people have trouble with dry eyes and blepharitis and are told conflicting advice on an eyelid hygiene regimen. So we created a video and short article on Dr. Jenna’s eyelid hygiene routine. You could put a page in front of this that requires them to put in an email before gaining access to this page. This page then gives them the exact products my wife uses with a link to Amazon to purchase.
We spend about $50 per week driving traffic to this article to make $400 in revenue on Amazon for a return on ad spend of $8 (RoAS) or in Amazon lingo, a 12.5% average cost of sale (ACoS).
Create the Giveaway
After you have determined what type of giveaway to use for your audience, it is time to make it. Whether it be a book or a simple handout, you can have it made for you with Fiverr.com. You can create your coupon code pretty easily on Amazon.
When planning this out, I recommend doing a little bit of research and outline your book or handout so the writer knows what you have in mind.
If you are not sure what PROBLEM your product solves, then I would recommend calling a few customers and asking them WHY they bought your product. You can also check the reviews of your product to determine why the customer bought it. Address the whole giveaway around this ONE problem and address the solution as being your product.
Here are a few examples:
For eyelid wipes, I want to target people that have blepharitis or dry eyes. This can be very overwhelming to think about all these different keywords. So, I am going to do some research on all the keywords (I am showing you two in this example, for simplicity) and pick one.
Let’s walk through an example of a handout I could create and what word to focus on.
1. Open up Google Keyword Planner
To use Google Keyword Planner, you have to spend some money on Google Ads. So spend a few dollars to get access to this free tool. Once open, click Discover new keywords.

2. Start with Keywords
Type in the keywords that you want to target in the search area. I like to include plural or misspellings that you can think of, but it is not necessary. You can even start with one keyword as well. Click Get Results after you have entered your keywords.

3. Browse the results
The results will show you a few things. They will show you other keywords that people search for as a result of searching for blepharitis or dry eyes, average monthly searches, competition of Google ads, and top of page bid (low range and high range).
I look for a few things in this area. I look for a large average monthly search volume combined with low competition and an inexpensive bid. This just means that a lot of people are searching for this and the competition is low, meaning people are competing for this keyword on Google Ads. Also if the bid is low, we can get more traffic for a lot less money.

After research, I am choosing to focus on blepharitis. It gets 201,000 searches per month with low competition and I can get on page 1 for $0.05 per click.
Another example is detox for our natural deodorant. I used a different tool for this one called SEMRush (affiliate link), which is a great paid tool. Google would not give me results for detox for some reason, which is why I used SEMRush.

Here is one for the search term paleo, in which we will focus on the paleo diet.
4. Outline your article
Next we are going to do the same search again, but as a phrase match so it only includes the keyword we want. To do this, we repeat the search above the same way we did before, we just put the keyword in quotations. Here are our examples: “blepharitis” “detox” and “paleo diet”
After we do this and hit search, it will then populate a list of what they think is relevant.
Here is what my outline would look like:
- Example: eyelid wipes
- Keyword: Blepharitis
- What is Blepharitis?
- Blepharitis Causes
- Blepharitis Treatment – Blepharitis management is all about having CLEAN EYELIDS, and with the right eyelid hygiene routine, dry, irritated eyelids can be a thing of the past. Here are 3 simple steps to help keep your eyelids clean:
- Always wash your eyelids and remove all your eye makeup using eyelid wipes, like Mediviz Eyelid Wipes. This will help reduce the harmful bacterial load on your eyelids.
- Then you want to wash your entire face with a tea tree face wash, like Heyedrate Tea Tree Foaming Face Wash.
- Lastly, cleanse your eyelids with a hypochlorous acid eyelid cleanser, like Heyedrate Lid and Lash Cleanser. You just spray this on your eyelids and leave it on.
- Don’t forget to apply an all natural moisturizer after.
- Keyword: Blepharitis
- Example: natural deodorant – You could come up with a FREE GUIDE: 7 Ways To Detox Your Body, and have your deodorant as number 1, explaining why each step is needed.
- Keyword: Detox
- How to Detox
- 7 Best Ways to Detox Your Body
- 1. Aluminum toxicity… The problem isn’t you… The problem is the toxic ingredients that you are putting under your arms. All the name brands have convinced us that we need to be using aluminum under the arms, but aluminum is toxic and here is why… What you need is a natural deodorant to put under your arms. As a side bonus, I have secured a 50% discount for you on your first purchase from Pit Polish.
- Apple Cider Vinegar Supplements
- etc…
- Keyword: Detox
- Keyword: Paleo Diet for paleo snacks
- What is the Paleo Diet?
- What To Eat
- Breakfast
- Lunch
- Dinner
- SNACKS!! – Under the snack section in the outline have a “My 5 favorite salty snacks for paleo diets.” Make this all your brand’s snacks and link over to Amazon.
- What To Avoid
It really is that simple.
5. Create a catchy title
Titles are best done with an odd number at the front, a superlative word next and then your keywords. This is best seen with examples:
3 Simple Step Guide to Blepharitis Management
7 Best Ways to Detox Your Body or 7 Best Ways to Detox Your Life
7 Worst Foods For Paleo – The Ultimate Paleo Diet Guide
6. Hire someone on Fiverr.com or write it
You can choose to write this yourself or you can have someone write this on Fiverr.com.
RELATED: Free Amazon PPC Masterclass
Create a List inside Klaviyo
Next you need to create a list inside Klaviyo to store all these emails that you are gathering. This step is going to require less of a thought process (like determining what lead magnet to create) and is more of just doing, so I will create a simple SOP (standard operating procedure).
1. Log in to your Klaviyo account or click here to create one (affiliate link)
2. Click Lists and Segments
3. Click Create List/Segment

4. You want to create a List, so click that option.
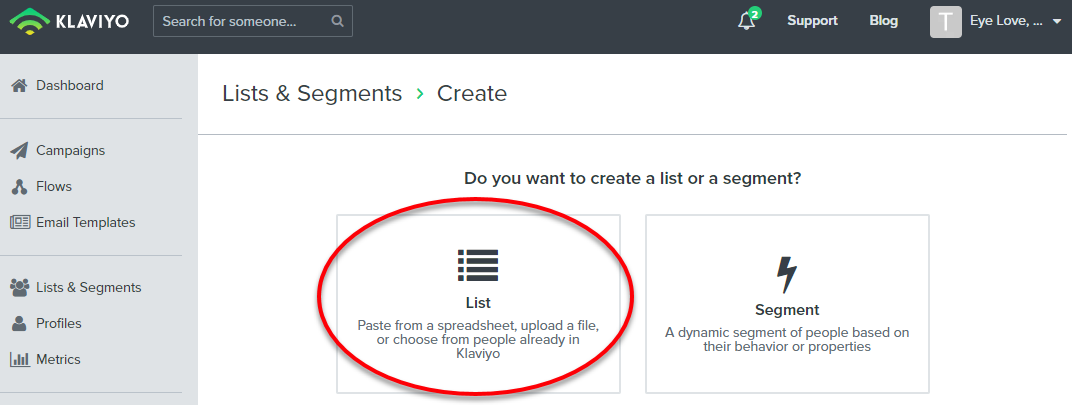
5. Name your list something simple that explains what the list is for (e.g. Lead Magnet – Dry Eye Book), then click Create List.
You can create a tag, but do not worry about that right now. This is great for audience segmenting if you have two different audiences that you cater to. An example of this is we have our sunglasses company and our dry eye company and tag them according to this.

After clicking the Create List button, your list is created.
Create a Flow inside Klaviyo
Next, we are going to create a flow inside Klaviyo that is very simple, and we can add to it as much as possible at a later date. In this example we are just going to create a THREE email flow that delivers whatever you are giving away for your lead magnet.
The basic and easy premise of this is that someone lands on your landing page and enters their email. You then send them two emails, with the first one being the giveaway/lead magnet and the second one being more about your product.
1. Log in to your Klaviyo account
2. Click Flows on the left
3. Click Create Flow > on the right

4. Choose the Welcome Series Standard.
You can either search by name or you can segment by what you want. This is what I LOVE about Klaviyo. There are all these different templates that you have to integrate with Shopify (not going into it here), but it also has great templates for a simple three part welcome series.

4. Name the Welcome Series, Add a Tag (optional), and Connect to the List.
I prefer to name my FLOW the same as the LIST name. You can add a tag as well. This is great for segmenting later on if you decide to send more targeted emails, which is more advanced, and I don’t even do this yet. I wouldn’t worry about this too much. Finally, you want the Trigger to be the list we created in the previous step.
After that, click Create Flow.
5. Edit the Time Delay (Timing) of Sending the Emails.
The first thing I like to do is change the delay. You can see in the above picture that Klaviyo defaults to sending an email immediately, then 3 days, then 4 days. I like to change this to immediately, 1 day, and 1 day.

5. Edit the Emails and change from Manual to Live After Editing.
You can click into each email to edit the subject line and to edit the email message itself. Keep it simple. In the subject I like to let them know it is exactly what they signed up to receive.
Regarding the email message, keep it very simple as well and do not go link crazy. I like to have only one picture (if any), and only have one link to the lead magnet that you are giving away.
After you have written your emails, make sure to make the emails LIVE.

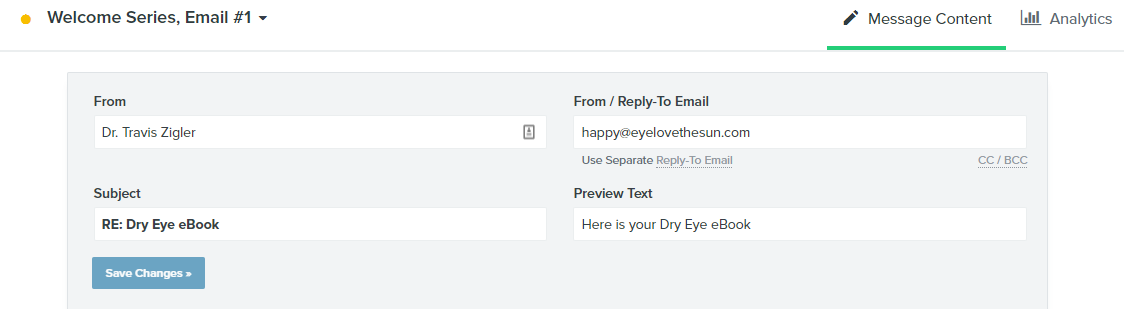
Here is an example of the first message:
SUBJECT: RE: Free Dry Eye eBook
MESSAGE:
Hey {{ first_name|default:” }},
As promised, here is your free Dry Eye eBook. After you head to that page there will be a download link at the top for you to read our book, Rethinking Dry Eye Treatment.
How to read the book: Read it quickly all the way through. Then after reading the whole thing, read and take action on 1 chapter each week. The changes that are recommended are very simple, but they are far from easy.
Isn’t it time to get your life back and start feeling relief from dry eyes?
YOU CAN DO THIS!!!
Our mission is to help 1,000,000 dry eye sufferers naturally, and I can’t wait to hear about your successes after reading the book.
One Love,
Dr. Travis Zigler
SeeEO of Eye Love
Here is an example of the second message:
SUBJECT: Quick Question…
MESSAGE:
Hey {{ first_name|default:” }},
Have you joined us in our private Facebook group, the Dry Eye Syndrome Support Community?
This is a community of like-minded individuals that are all trying to heal their dry eyes. We discuss different treatments that are working, we do live videos, and post helpful blog posts.
Join us today!
One Love,
Dr. Travis Zigler
SeeEO of Eye Love
Here is an example of the third message:
SUBJECT: The best kept secret in dry eye?
MESSAGE:
Hey {{ first_name|default:” }},
I know you’ve probably tried everything for your dry eyes. Prescription drops, every over-the-counter drop, medications, supplements, warm compresses… The list goes on and on.
But what if I told you that one key part of dry eyes is cleaner eyelids. Your eyelids are responsible for releasing an oil called meibum onto the eye, which keeps your eyes lubricated and moist.
One of the best ways to keep your eyelids clean is by simply spraying on a hypochlorous acid eyelid cleanser twice a day after you have washed your face.
My wife made a great video and a blog post about her eyelid hygiene routine to help reduce her dry eyes.
One Love,
Dr. Travis Zigler
SeeEO of Eye Love
Create a Landing Page inside Zipify pages (on Shopify)
Zipify pages is by far my favorite landing page software that I have used and it integrates so seamlessly inside of Shopify. I have used Leadpages, ClickFunnels, Kajabi, Ontraport, and regular Shopify pages. None of these even come close to the success and EASE that Zipify pages has.
Side note, Zipify pages is made by Smart Marketer and they make another app called One Click Upsell.
This is the FIRST app I recommend all brands using Shopify to install. The reason? It helps to increase the average order value of your purchases right after installation. One Click Upsell sends them into a post-purchase (after checkout) sales funnel that you can customize. The easiest thing to sell your customer on is more of what they just purchased.
Going into the above example with Pit Polish natural deodorant, I would sell them 3 more of the same scent and same jar with a 10-20% discount.
Back to landing pages with Zipify pages. We are going to create a very simple landing page to collect their email address and then send them to a simple thank you page to give them the deliverable.
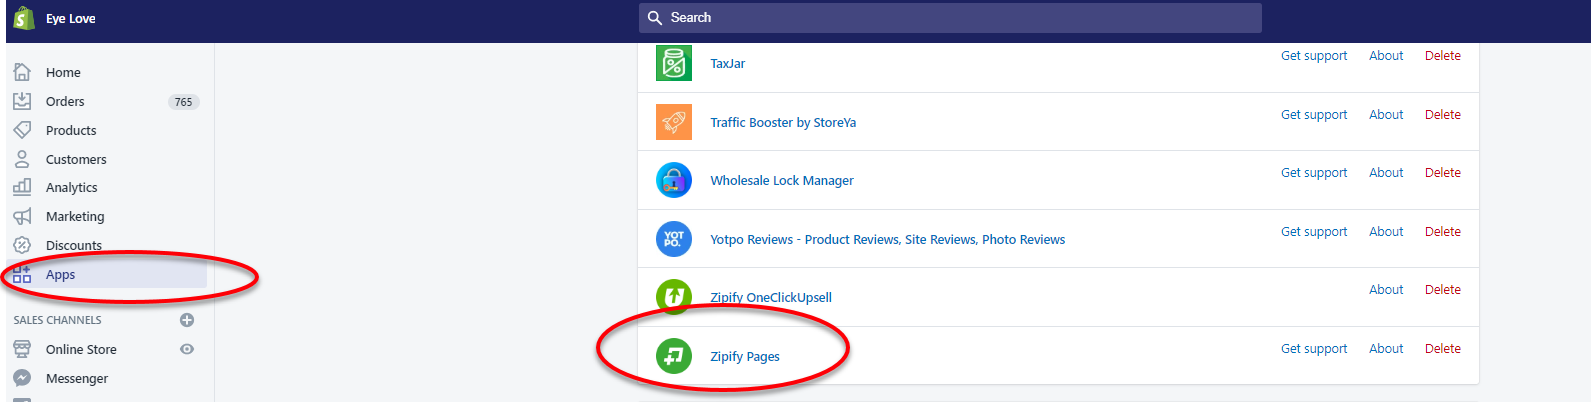
1. Click here to sign up for the Zipify pages app on Shopify (affiliate link).
After signing up, install it into your Shopify store. Once installed, go to your apps in Shopify and click on Zipify pages.
2. Click New Page

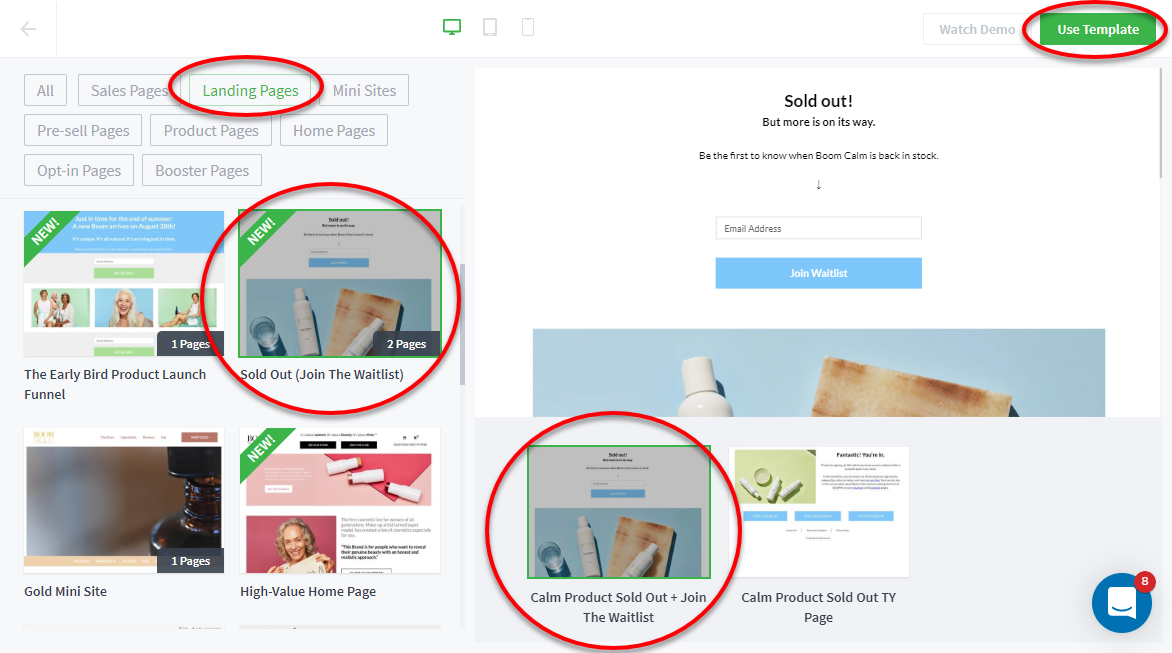
3. Select the Landing Pages option.
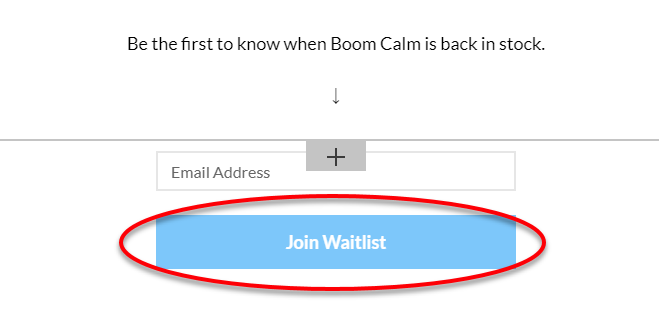
I am going to use the Sold Out (Join the Waitlist) → Calm Product Sold Out + Join The Waitlist template. Then click Use Template.
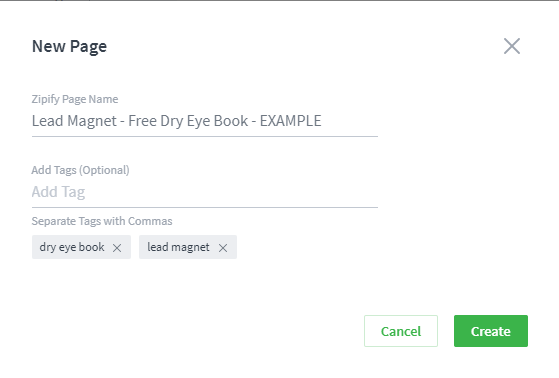
4. Name your Zipify pages
I like to name the Zipify page the same as the flow and list to keep things super simple. I will also add the tags “dry eye book” and “lead magnet”. After this hit Create.
Then it is simply customizing the page how you see fit. I like this template because it is very simple. Watch the video above to see how I customize this page.
Examples of landing pages:
Create a Thank You Page inside Zipify Pages (on Shopify)
This process is the same as the above process, except we are going to select the TY page (thank you page) as the template.
1. Click New Page
2. Select the Landing Pages option.
I am going to use the Sold Out (Join the Waitlist) → Calm Product Sold Out TY Page template. Then click Use Template.

3. Name your Zipify pages
I like to name the Zipify page, the same as the flow and list to keep things simple. I will also add the tags “dry eye book” and “thank you page”. After this hit Create.

Same thing as above. Customize this anyway that you want. Watch the video to see how to play around and customize Zipify pages.
Examples of thank you pages/articles that you are delivering the lead magnet with:
- Free eBook Thank you Page
- Mail-In-Rebate Thank You Page
- Rosacea article after giving email for 7 Rosacea Treatment Tips
Connect Landing Page, Flow, List, and Thank you page inside Zipify pages (on Shopify)
We first need to integrate Klaviyo and Zipify pages, which is a very easy process.
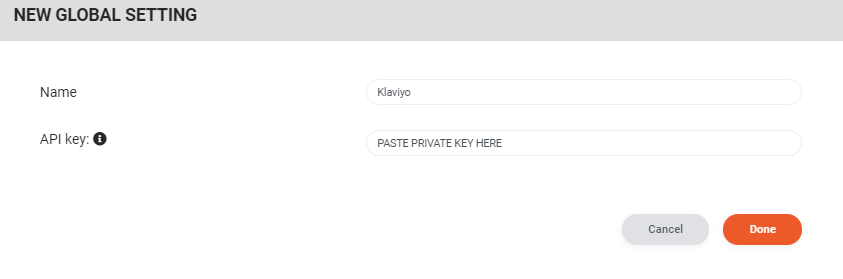
1. Get your Private API Key from Klaviyo
First, log in to Klaviyo and head to your Account settings by clicking on the name of your company in the top right corner and then clicking Account.

Next, click Settings, then API Keys
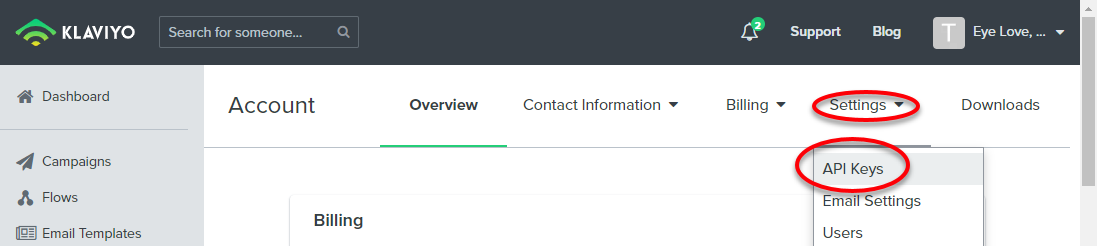
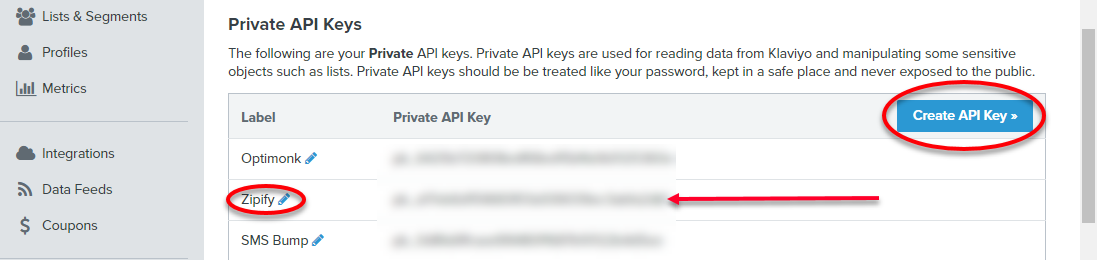
Finally, click Create API Key >>, then label it Zipify and copy the Private API Key that I have blurred out in the picture below.
2. Enter your Private API Key from Klaviyo into Zipify pages.
Simply take the copied Private API Key from Klaviyo and go back to Zipify pages and click Settings, then CRMs. Navigate to Klaviyo, paste your Private API Key and hit Connect.

3. Connect your landing page with Klaviyo.
This part is pretty easy. Navigate back to the Zipify landing page, and open it up to edit it.
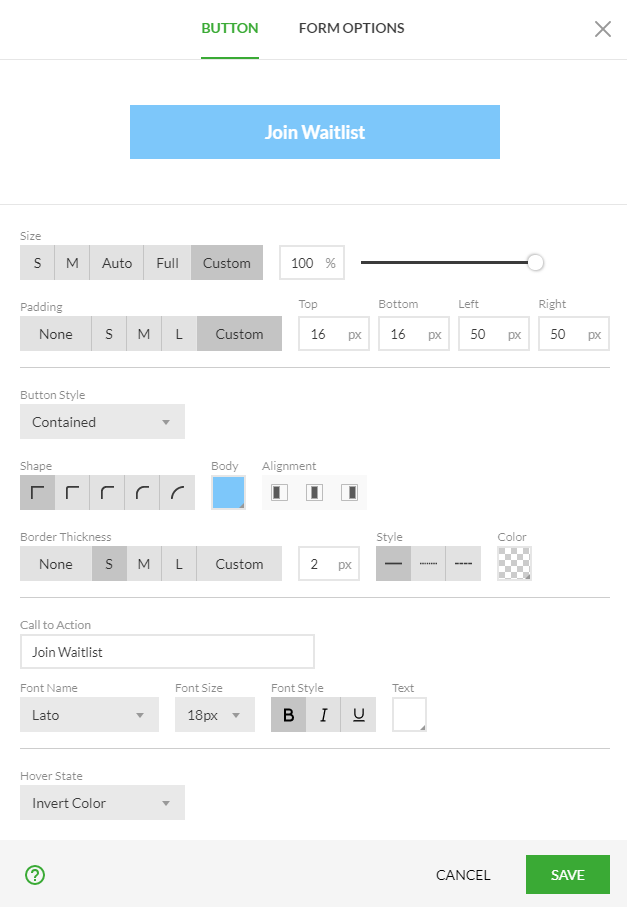
When you click on the button that has the call to action, it pulls up a menu.
Here you can customize the color of the button, size, what it says, etc..
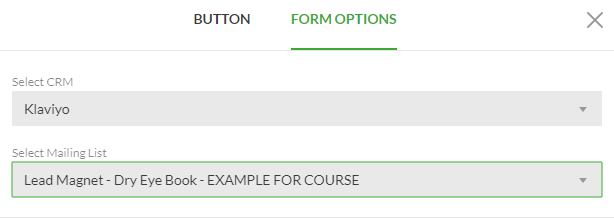
If you click Form Options at the top of the menu, that will bring you to the area where you connect to Klaviyo. Select Klaviyo in the Select CRM menu and then find the name of your list for the Select Mailing list menu.
Once they opt in to your lead magnet, they will then get the first email with your lead magnet. Also, you can choose where they go from there. At the bottom of the Form Options menu, I like to direct people to a custom landing page that I have previously created. Find the Post Submit Actions and select Direct visitor to previously created page, and then select your thank you page.
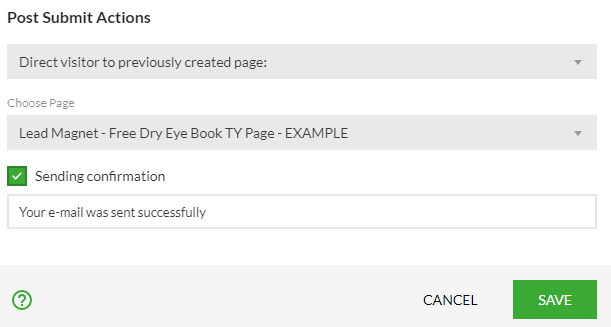
THE PAGE THAT YOU DIRECT THEM TO HAS TO BE PUBLISHED IN ORDER TO BE ABLE TO SELECT THIS OPTION.

Then click Save.
Add an Exit Intent Pop-Up using Optimonk
Creating an exit intent or a timed pop-up on the page will increase the amount of emails you have even more, so I highly recommend this step. This is a completely optional step and don’t let this step stop you from moving forward. If you just want to start driving traffic now, skip to the next step, and come back to this.
With that being said, this step only takes about 5 minutes to connect Optimonk and then another 10 minutes to create the pop-up. We have also tried multiple exit intent and popup software programs and find the integration and tools that Optimonk has far superior to the rest that are out there.
We first need to integrate Optimonk and Shopify, which, again, is a very easy process.
1. Click here to create your Optimonk account (affiliate link).
2. After you have created your Optimonk account, click on the little gray circle to pull up the submenu, then click Settings. After the Settings menu pulls up, click Insert Code, then Shopify, and follow the directions below to install the app into your Shopify store. It is that easy.

3. Create your first campaign
After logging in and opening the app from your Shopify apps menu, click New campaign.
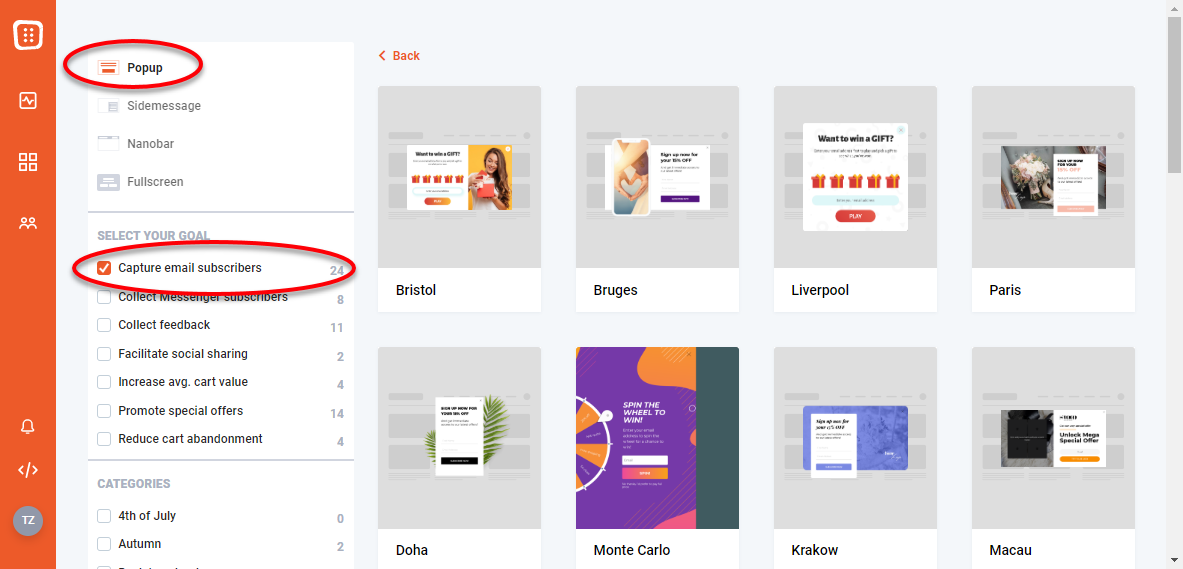
4. Select your pop-up
Choose the option for Popup and Capture email subscribers. Select the popup that works best for the look you are going for. Don’t get too picky as this whole popup is customizable.
5. Name your campaign and assign the URL
Pick the domain you want this to appear on. Most likely you will only have one option here. The nice thing about Optimonk is that you can use the same account on up to 10 different domains, which is great if you have multiple websites from a cost savings standpoint.
Pick the same name as you used for the list, flow, and landing pages.

6. Customize the popup, thank you page, and teaser
Watch the video above to see me customizing this page and turn it into the one I will be using. You can customize everything from the pictures, text, and button to the colors and what input to collect like email or Facebook messenger.
The main popup is what you will customize first, then customize the thank you page, or what they see after they enter their email (this is optional), and then finally customize a teaser, which is an icon they will see until they either see and close the popup or enter their email address.

7. Choose when to show this popup
By default, On exit-intent is usually always chosen and it is for both mobile and desktop.

I like to add two more, by clicking Add new trigger, and adding After x percent scrolling, in which I select 50% and After x seconds, which I select 7 seconds.

8. Choose WHO to show it to
By default it will show to a visitor two times total with an hour in between. I usually change this to show much more, like ten.

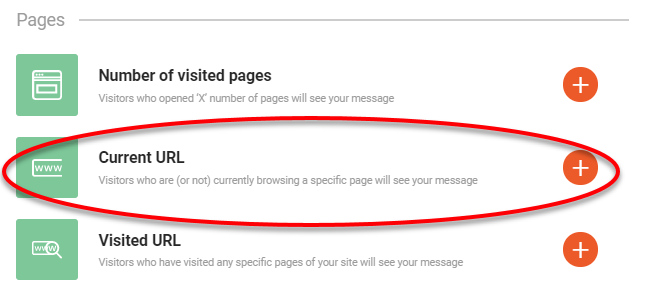
I also like to add a new condition here and pick which pages this shows on, and I will add the URL from the landing page that we created in the previous step.
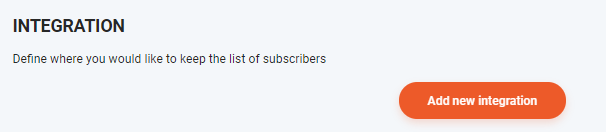
9. Next, we want to integrate it with Klaviyo
Again this is a super simple step that should not intimidate you as all these programs make it incredibly easy to do. Click Add new integration, and follow the same steps above to get your Private API Key from Klaviyo and enter it into here.

10. Get your Private API Key from Klaviyo
First, log in to Klaviyo and head to your Account settings by clicking on the name of your company in the top right corner and then clicking Account.
Next, click Settings, then API Keys
Click Create API Key >>, then label it Optimonk and copy the Private API Key that I have blurred out in the picture below.

11. Enter your Private API Key from Klaviyo into Optimonk .
Simply take the copied Private API Key from Klaviyo and go back to Optimonk. Enter your Private API Key into the integrations section.

12. Connect Optimonk to your specific list inside Klaviyo
Again click Add new integration. And then select Klaviyo. Finally, find your List name and select it.


13. ACTIVATE your Optimonk popup
It is time to activate the popup and let it start producing results for you.

Up to this point you should have a great lead magnet, list created in Klaviyo, a short flow created in Klaviyo, a landing page created in Zipify pages, a thank you page created in Zipify pages, a popup created in Optimonk for those pages, and they should all be connected.
Test them out to make sure everything is activated and working before moving on to driving traffic to the pages. This is the part that gets really fun, and I haven’t shared this strategy with ANYONE until this article. This Google Ads strategy is something we have been doing since December 2019 with amazing results. We continue to add to this strategy twice weekly to build our audience and make people aware of our products.
RELATED: Click Here To Access All FREE Courses on SalesFunnelHQ.com
Driving Traffic with Google Ads
This is where everything starts to get REALLY fun. My Google Ads strategy is something that I have been using since November 2017 with amazing results. Not only has this helped me build up to gaining around 50 email leads per day, but it has also generated a TON of revenue for us on Amazon as well as boosted our organic ranking since we are driving external traffic.
THIS IS THE PART THAT YOU CAME FOR.
All this should work out well if you’ve followed the steps above and created a compelling offer (lead magnet) and a decent landing page (doesn’t have to be great, just get started). Let’s show you this SIMPLE Google Ads strategy that anyone can do (including YOU who may have never touched advertising before).
One last additional note before we dive in. This doesn’t just work for driving traffic to a lead magnet. This strategy works EXTREMELY well to drive more traffic directly to Amazon, any website page, shopify, your blog, an etsy shop, an affiliate link, your YouTube channel, your ecommerce site, and more.
1. Log in to your Google Ads account (or create one)
Simply head over to Google Ads and create an account or log in with your current account.
2. Create a new campaign and select campaign settings
Click + New Campaign.

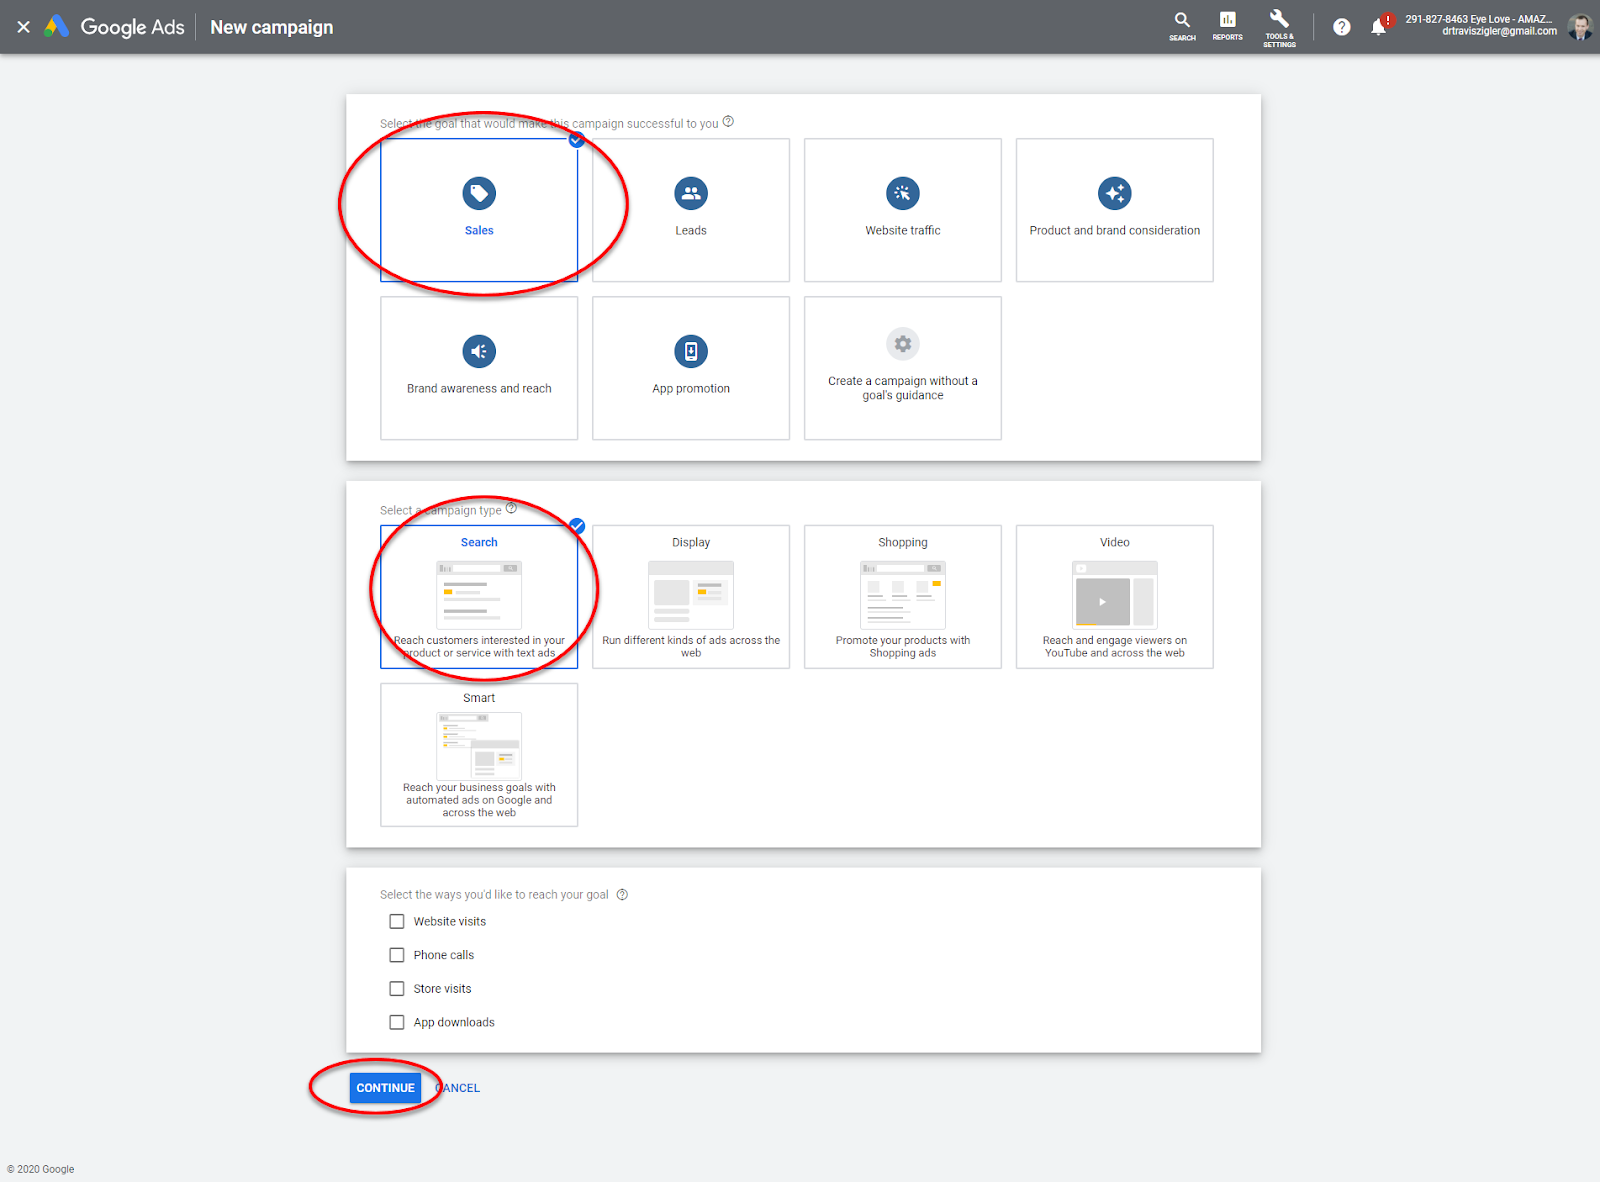
In the settings of the campaign, you’ll pick a Sales goal, because although we are collecting leads, our end goal is to get them to buy a product. Google and Facebook divide their people into three categories: buyers, clickers, and browsers. We want to target the buyers more than anything else.
Create a Search campaign type as we are going to target customers on Google who are searching on Google.
Then click Continue.
For the General Settings, name your campaign the same as all the other flows, lists, and popups (e.g. Lead Magnet – Dry Eye Book).
Uncheck Include Google search partners and Include Google Display Network as these are a big way to waste a lot of money. This will ensure that you are only delivering to customers that are searching on Google.

For Targeting and audiences select the location that you are targeting and the language. These are the only two options that need selected here.

For Budget and bidding, pay VERY close attention to this step. Set your budget to whatever you are comfortable spending. I recommend at least $2-$3 per day. We have some that are spending over $100/day and bringing in massive sales and leads for us.
In the bidding section select Or, select a bid strategy directly (not recommended).

After you do this, select Manual CPC from the drop down menu under Select your bid strategy.

UNCHECK the Help increase conversions with Enhanced CPC.

Ignore Ad Extensions for now, as this is training for another day.
3. Set up your Ad Group and targeting (MOST IMPORTANT STEP)
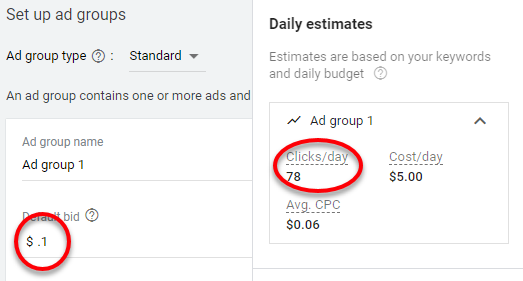
This is what can make or break your campaign so pay very close attention to this step. The goal with this is to drive as much traffic for the cheapest amount possible. What we will be doing is starting at a cost per click of $0.01 with a broad match on all the keywords we are going after (e.g. blepharitis, detox, paleo).
Put all the words that we want to go after in the box.

Next, we are going to start off with our bid at $0.01 and look how many clicks Google predicts we will get per day to this page.
We are then going to increase this by $0.01 until we find the most clicks per day for our $5 budget.


For blepharitis and dry eyes here is what it looks like:
| Default Bid | Clicks/Day |
| $0.01 | 15 |
| $0.02 | 23 |
| $0.03 | 51 |
| $0.04 | 71 |
| $0.05 | 98 |
| $0.06 | 111 |
| $0.07 | 100 |
| $0.08 | 92 |
| $0.09 | 85 |
| $0.10 | 78 |
For paleo and paleo diet here is what it looks like:
| Default Bid | Clicks/Day |
| $0.01 | 58 |
| $0.02 | 79 |
| $0.03 | 166 |
| $0.04 | 153 |
| $0.05 | 123 |
| $0.06 | 106 |
| $0.07 | 98 |
| $0.08 | 92 |
| $0.09 | 87 |
| $0.10 | 82 |
4. Create your Ad
Your ad needs to discuss exactly what your lead magnet is. Out of 100 clicks to your page you will probably get anywhere from 2 to 20 email sign ups. Keep split testing and adjusting the page accordingly to increase this.
Again, this is a volume play. You are getting as much traffic to this free lead magnet for a very little price.
Here is what my ad looks like:

5. Create your tracking sheet and monitor every 2 weeks
You can choose to track your results any way that you want. Monitor how many emails you are getting into that list in Klaviyo. Monitor how many sales you are driving to Amazon through an Amazon Affiliate link (just comply by all their rules).
I choose to track them manually as we use a little bit of a unique system. Inside our lead magnet are links to purchase our products from Amazon. Amazon has come out with links that you can create that help track this, but I have found them to be very unhelpful and useless. Here is the spreadsheet I use to track them.
What I do instead is track through Amazon’s affiliate account. I will not go into how to use Amazon associates in this training, but essentially you make a special link to your product that has a tracking code on it.
Step-By-Step Guide To Tracking
We will be using a simple spreadsheet to calculate your Average Cost of Sale (AcOS) and Revenue Per Dollar Spent (RoAS).
Open this spreadsheet, go to FILE and MAKE A COPY

RoAS – Also known as Revenue per dollar spent. This will help a lot in knowing how many dollars you put in and how many dollars you get in your revenue.
ACoS – This is where Amazon will calculate the effectiveness of your advertising.

Sign in to Google AdWords and click Campaigns

Look for your Campaign on the list
Here we will be using our “What is MGD?” article as our example.

Customize the dates within the last 2 weeks. I like to let data accumulate over two weeks.


Then it will pull up the details that we need. Look for the cost of the Article and copy it
- By using our example, the cost of the Article about “What is MGD?” is $25.46

Paste your Google Adwords Spend cost on your Google Spreadsheet created.

Now look for the Amazon Associates Revenue for the Product by going to your Amazon Associates account
Click Reports

Customize the date to the same as the date you chose on Google AdWords
- Click Custom Date Range
- Choose the dates
- Hit Apply

Scroll down below and you will be able to see your campaign that matches up with your Article. Click the Campaign.

Look for the products that you sold. Let’s say on the list below, you sold the first two products. Sum it up and it will gives you $87.66.

Go back to your Google Spreadsheet. Type in the total amount you get for your Amazon Associates Revenue for your product.

On our example it will show that for every dollar we’re putting in to our Google AdWords Campaign we’re getting $3.44 out and the average cost of sales is 29%. This is a very effective campaign as you are making a great ACoS AND you are driving external traffic to your listing.

We will look at our RoAS and ACoS again after 2 weeks and see if it is continuing to do well. Then, we can adjust the CPC inside Google Ads (up or down) depending on RoAS and ACoS. We can also increase our budgets if profitable, but ONLY if profitable.
Serving Your Audience
Like stated above, but worth repeating, you should wake up every day thinking about how you are going to BUILD and SERVE your audience. Now that we’ve discussed building your audience, we need to know how to serve them as well. This is VERY simple and something we will dive much deeper into on another blog post.
There are multiple ways to serve your audience, and I am going to start with the easiest way and work up to more difficult ways.
Create a gathering place that solves their problem
This can be a simple Facebook Group, like Amazon PPC Pros or the Dry Eye Syndrome Support Community.
Post to the community or email blogs from OTHER people that provide value to them
Put a Google trend alert on your space and post OTHER people’s content to the groups if you are not creating your own.
Write blogs and post in the community, or email them to your list
Better yet, write your own blogs and post them to the community to SERVE them, not sell them!
The Listicle
A listicle is simply a list that would be helpful for them to use or it can be a “best” list like 7 best eyelid scrubs or 7 best natural deodorants (and another) or 7 best salty snacks for paleo diets. A listicle can also be a helpful remedy to something.
Here is an example of a listicle we did called the the 7 Best Essential Oils for a Stye, highlighting how great tea tree oil is and examples of products that contain tea tree oil that are eyelid cleansers. We also educate on how to get rid of a stye (by using our products).
Record and post videos
Once you have written a blog, record and post a video to the community to serve them.
Go live in the community
Once you have written the blog, go live on YouTube or Facebook to go over your blog post or you can even discuss someone else’s blog (give them credit, of course).
Software Recommended in This Training
I appreciate you watching/reading this training. I am able to keep these trainings free because I am an affiliate for the software I recommend. With that being said, I honestly use everything I recommended in this training quite a bit. So if you received value and are going to use the software mentioned, please click the affiliate links below to help pay for me to continue this! 🙂
- Fiverr.com: Content Creators
- Klaviyo: Email Software
- Zipify pages (Landing Page Software on Shopify)
- Optimonk: Exit Intent Software
RELATED: Click Here To Access All the FREE Courses on SalesFunnelHQ.com
RELATED: Free Amazon PPC Masterclass
FAQs about Building an Audience
Disclosure: I am an independent ClickFunnels Affiliate, not an employee. I receive referral payments from ClickFunnels . The opinions expressed here are my own and are not official statements of ClickFunnels or its parent company, Etison LLC.
![The BEST Reverse ASIN Lookup + How To Use Guide [HELIUM 10 CEREBRO]](https://salesfunnelhq.com/wp-content/uploads/2020/07/Copy_of_Amazon_PPC_Negative_Keywords-e1594679511607.png)