New Amazon PPC software and tools seem to be popping up every day and they all seem to be different. You need Helium 10 to do keyword research and ManageByStats to track profitability and send emails. Then there is Amazon PPC. Believe me when I say, there are a ton of automated tools for Amazon PPC on the market, but I will start off by saying that automation with Amazon PPC is NOT always the best route.
I will not mention tools that I previously used, but with these automated tools, we tend to lose sight of our Amazon PPC and think that the tools will take care of everything. THIS WAS MY HUGE MISTAKE. Automation has cost me hundreds of thousands of dollars in lost sales and rankings.
Enter Samurai Seller.
I met Aaron, the founder of Samurai Seller, in 2018 at a conference and we have stayed in touch since. We discussed his new tool in 2019 and what attracted me to it right away was that it wasn’t fully automated (although that part is coming), but only partially automated.
Samurai Seller essentially whips up the reports that my team used to spend hours on, instantly.
In this article and video (multiple videos), I am going to walk you through the steps to implement Samurai Seller on your account and also walk you through the amazing reports that Samurai Seller gives you.
Make sure to check out my FREE 8-week Amazon PPC Masterclass by clicking here.
7 Best Amazon PPC Automations to Implement Today With Samurai Seller
1. Setting Your Target ACoS and Global Settings in Samurai Seller
Before we get into Samurai Seller’s functionality we must set it up. We need to have a few global rules for the whole account and we also need to set a Target ACoS for either your entire account or on a per product basis.
If you need help figuring out your target ACoS, I would check out this article on calculating it and how we name our campaigns so you always know what we’re working on.
Inside Samurai Seller, setting the target ACoS is critical for every calculation that is done inside your account.
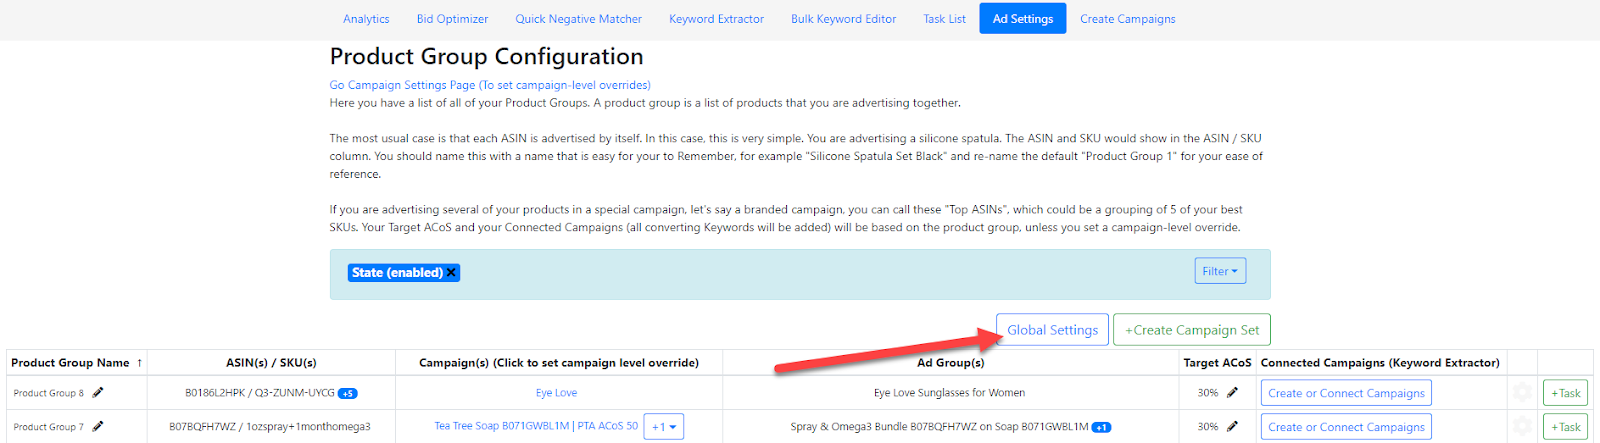
Go to Ad Settings:

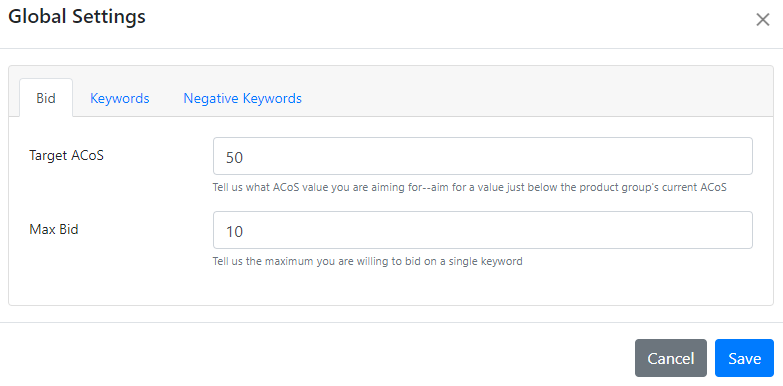
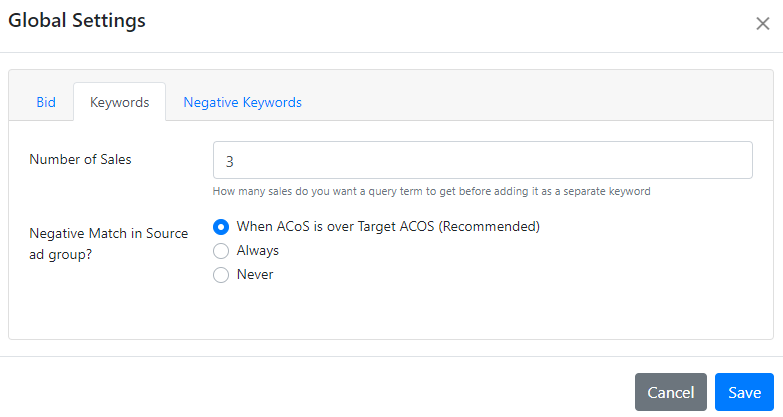
Let’s first set up the Global Settings:
You want to individualize your target ACoS on a per product basis, but I still like to set the overall account Target ACoS to 50% and my Max Bid to $10. I tend to lean on the more aggressive side to bidding as it helps with overall organic rank and organic sales when our Amazon PPC system is followed.
Next, we will set the Number of Sales to 3 as I don’t believe that you get enough data from a single sale or even two. Set the Negative Match in Source Ad Group to “When ACoS is over Target ACoS (Recommended).”
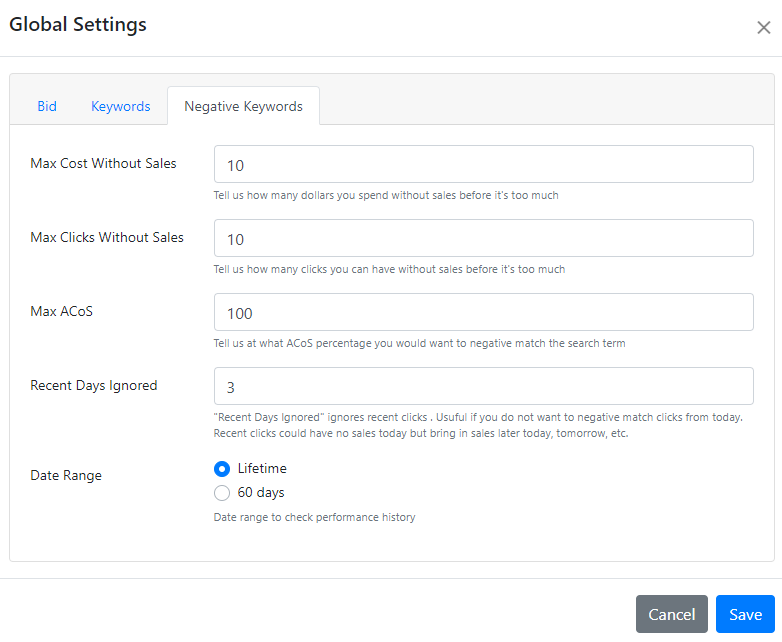
For Negative Keywords, you can see my recommended settings in the picture below. I will spend $10 before I want to see it as a negative (Max Cost Without Sales), I prefer to have a negative keyword after 10 clicks without a sale (Max Clicks Without Sales), and Max ACoS of 100%.
For the Recent Days Ignored, I set it to three, due to Amazon’s attribution window being five days, but most sales don’t occur after 24 hours, so in reality you could set this to one if on a tight budget.
Date Range should be set to lifetime initially to purge your account of all the negative keywords, but then could be set to 60 days after that. 60 days is also helpful if you have a more seasonal product.
Let’s go through what each of these areas means.
Product Group Name is the name you give to your product to recognize it. We use product name, ASIN, and Target ACoS
EXAMPLE: Lincoln Black B0755GW72V ACoS 49
ASIN(s)/SKU(s) is pretty self-explanatory and is just the ASIN and SKU associated with that product
Campaign(s) is all the campaigns that are associated with that ASIN/SKU as well as all the Ad Group(s) associated with that ASIN/SKU. If you see a number beside it, that means there are multiple campaigns/ad groups for that product.
Target ACoS in my opinion should be set at breakeven ACoS so you can be a little more aggressive and find more valuable search terms. Most get this part wrong and just go after a low ACoS, which means that you are leaving a lot of money on the table from not being aggressive enough.
2. Setting Up Your Four Horsemen Campaign Strategy ‘
According to Samurai Seller, the best strategy to implement is the four horseman campaign strategy. This consists of an exact match campaign, phrase match campaign, broad match campaign, and a product targeting campaign. They recommend having only one campaign per match type, especially the exact match and you may want to consider separating out high converting search terms into their own campaign to take advantage of Amazon’s Top of Search Placement bidding and other features that are available at the campaign level only.
This is a fairly quick and easy set up inside Samurai Seller. Inside the ad settings, we need to either connect to an existing campaign, or follow their recommended four horseman technique, and create the 3 campaigns that they recommend.
The broad and phrase match are there to discover new keywords ONLY. These will still be a little more expensive, but we are trying to discover the profitable search terms that will allow you to scale your advertising. The exact match is your scale campaign that will really take you to the next level.
We used to do this extraction about once a month, but can do it weekly with Samurai Seller.
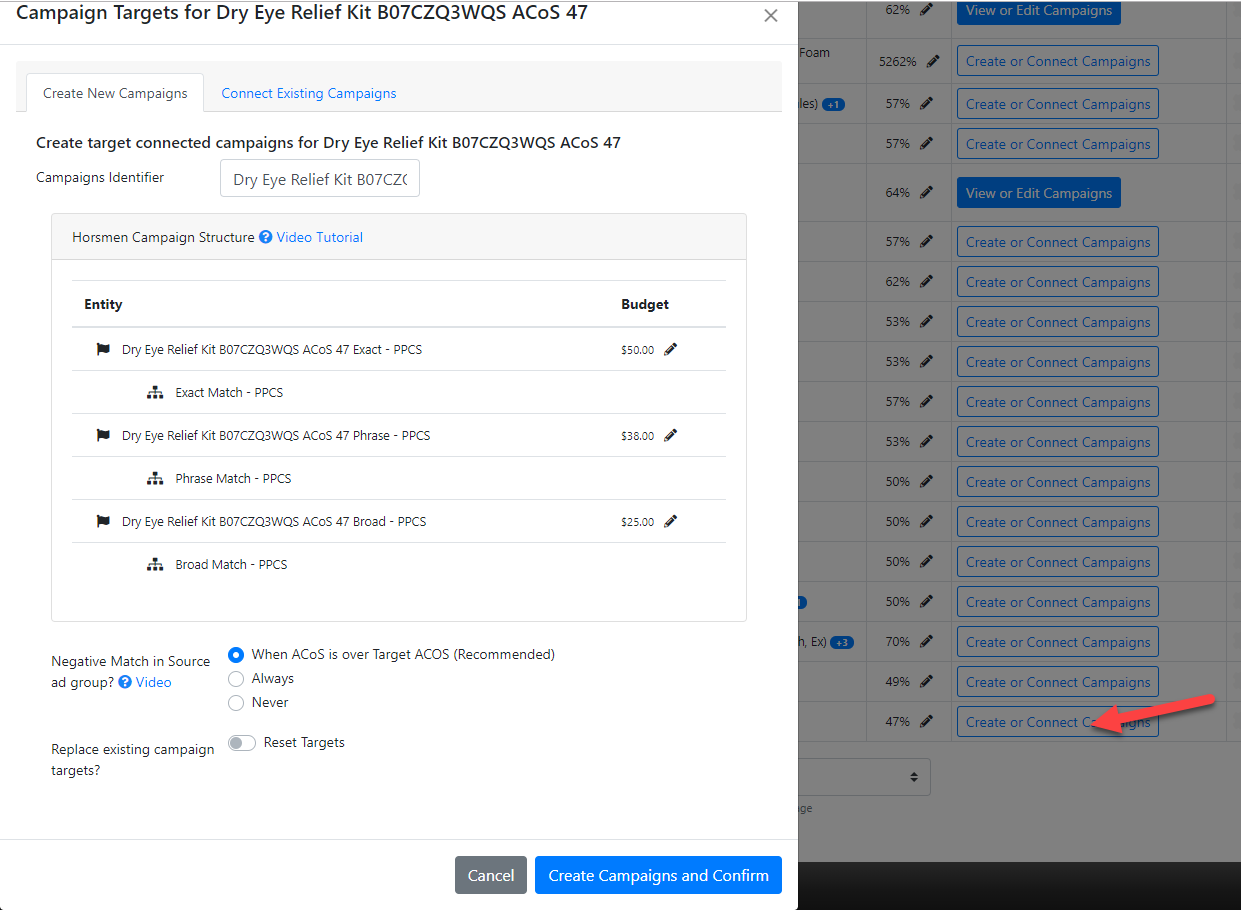
Find your product and click Create or Connect Campaign.
As you can see, if you are creating a new campaign, they set everything up for you and you just click Create Campaigns and Continue. If you want to connect to an existing campaign, click that tab at the top.
3. Quick Negative Match Tool in Samurai Seller
We set this up above, but it is worth repeating the global settings.
For Negative Keywords, you can see my recommended settings in the picture below. I will spend $10 before I want to see it as a negative (Max Cost Without Sales), I prefer to have a negative keyword after 10 clicks without a sale (Max Clicks Without Sales), and Max ACoS of 100%.
For the Recent Days Ignored set it between three and seven days (I set it to three) due to Amazon’s attribution window being seven days in Seller Central (but 30 days through the API with Samurai Seller), but most sales don’t occur after 24 hours, so in reality you could set this to one if you were on a tight budget. If you sell a higher ticket item, setting this higher would be more beneficial.
Date Range should be set to lifetime initially to purge your account of all the negative keywords, but then could be set to 60 days after that. 60 days is also helpful if you have a more seasonal product.
The Quick Negative Matcher is where the automation for Amazon PPC really starts to kick in. Usually you would have to download and sort a report and then upload the keyword to each individual campaign. With Samurai Seller, you can review the keywords right there, click one button to negative match them (phrase or exact), and you can even change the phrase a little bit and then upload it to Seller Central with one click.
When you use this tool it will make a negative match across all your campaigns (Broad, Phrase, and Auto) for that product.
We recommend checking this part at least three times per week and combing through the keywords.
4. Keyword Extraction (Vital Part of Amazon PPC)
Keyword extraction could be the MOST vital part of your Amazon PPC success. Doing this before Samurai Seller was a very manual process that took hours to complete and organize. With Samurai Seller, they pull the report and organize it for you. They even allow you to click one button to implement the changes they recommend.
Keyword extractions will allow you to spend less and sell more than your competition on Amazon AND figure out the exact bid that you need. It is essentially extracting out your high performance keywords and eliminating the keywords that are spending a ton of money. Most sellers are NOT doing this and so you will win if you extract keywords.
5. Bid Optimizer
Make sure that you have set your target ACoS in the Ad Settings section before attempting to use the bid optimizer. The Bid Optimizer tool inside Samurai Seller will not turn on for the first five days as it collects data about the history of your bids and tracks the bid changes, added keywords, and removed keywords from your account.
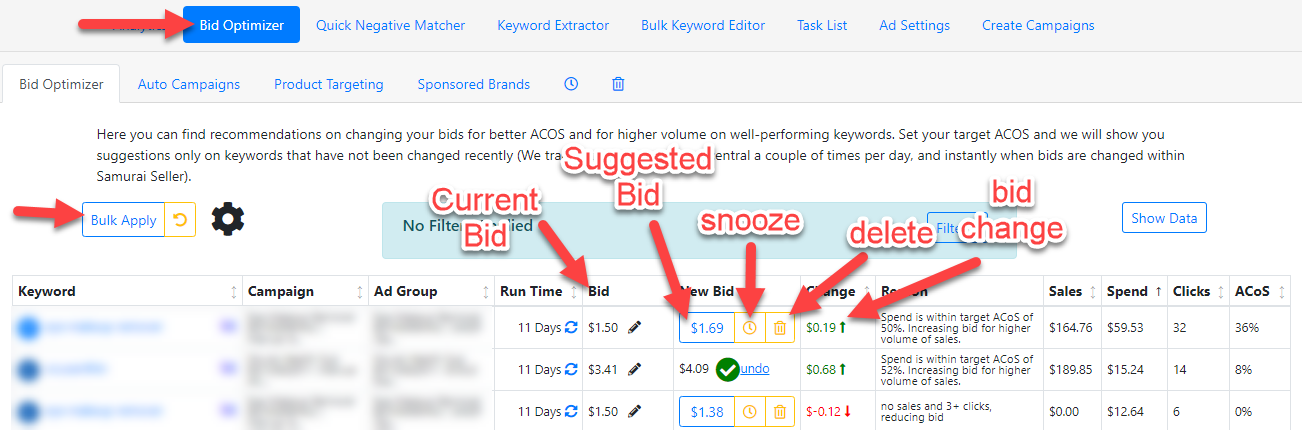
After the five days it will then show you whether you need to adjust your bid up or down depending on your target ACoS. Head to the Bid Optimizer tool and review the suggestions to see if you want to do them or not. Apply the suggested changes on any or all of the keywords. If you are comfortable with all the suggestions there is also a bulk apply button to add all the suggestions on the page to your amazon campaigns.
Some other great features of the Bid Optimizer include the ability to snooze the keyword for a week or delete it entirely from the suggested changes. You can also see your current bid and the new bid they are suggesting with the change in between the two and the reason they are suggesting this change.
Samurai Seller’s Bid Optimization tool doesn’t just do your manual campaigns. It also does your product targeting ads, sponsored brand ads (headline search ads), and your auto campaigns, which I have never been able to find in other tools.

You can go into Bid Optimizer essentially daily to make changes, but it will only allow you to make changes on the same keywords after a few days have passed so it can get more data, but new keywords will show up all the time.
6. Bulk Keyword Editor
This is one of the most useful tools to use in Samurai Seller. Although it is not an automated part of the tool at all, it allows you to pause keywords that are just not working for you. In our business we pause any keyword that has more than 10 clicks without a sale or if our ACoS is greater than our target for that particular product.
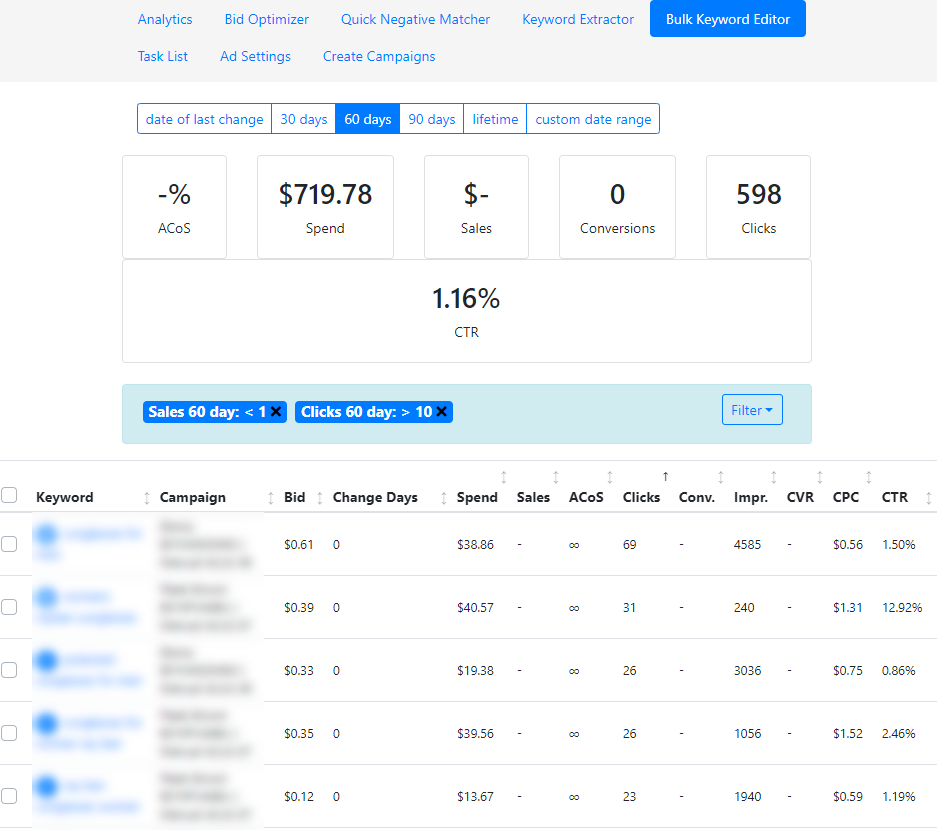
This is the filter of greater than 10 clicks without a sale in the last 60 days. All in all, this is going to save me $719.78 shutting these keywords off as indicated by the top.
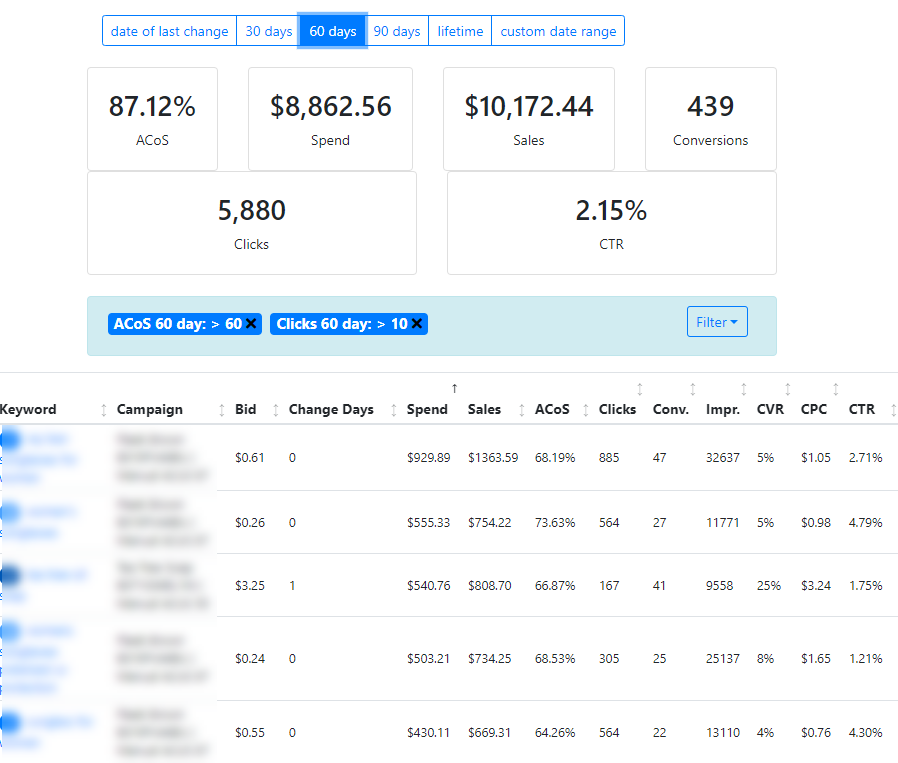
This is the filter of an ACoS greater than 60% and more than 10 clicks. I am a little more picky when going through these search terms as there may be some that are making a lot of sales at a higher ACoS that I want to keep on as they drive organic ranking.
7. Task Creation With The Task List
This could be one of my favorite parts of Samurai Seller. Creating a task is incredibly useful for two reasons.
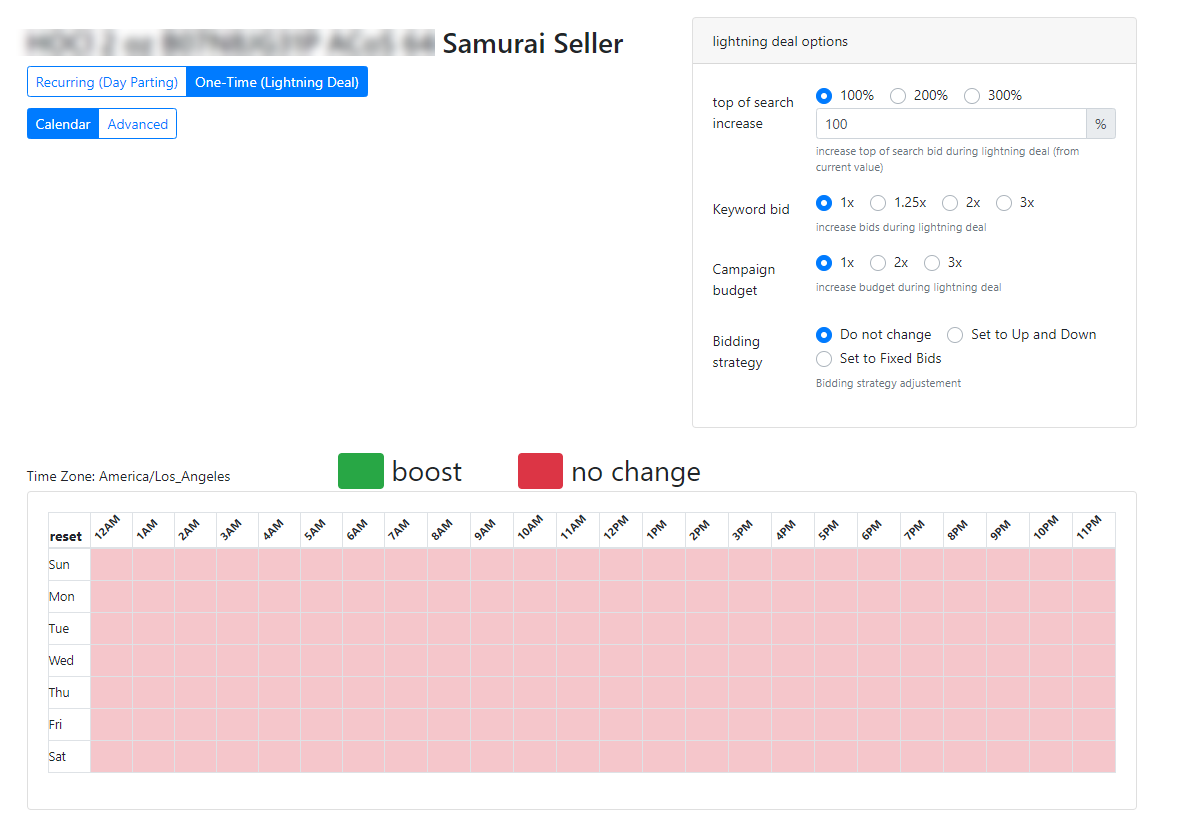
First is a lightning deal boost. If you have a lightning deal coming up you can change the settings of your ad campaign to be more aggressive for the time of the lightning deal only, and then go back to normal after it is over.
If you want to go very aggressive, I would increase top of search to 300%, keyword bid by 2x, increase your campaign budget, and setting it to up and down (VERY aggressive to move to up and down).
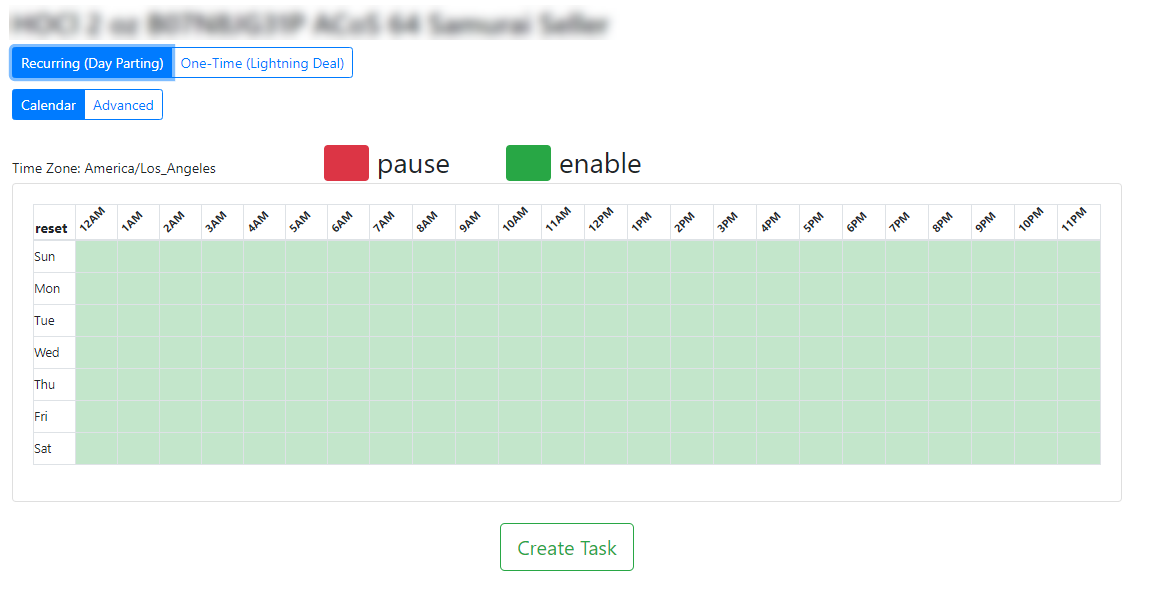
Second, if you notice that all your sales come in the evening, why not shut your ads off in the morning and turn them back on around 3:00 pm or so. This is called Day Parting. When everyone else has run out of budget, you will be right there on top of the search results. This is something that is worth testing to see if it lowers ACoS, increases sales, and reduces overall ad spend.
Overall Samurai Seller is an extremely useful software tool to add to your arsenal. Anyone from beginner Amazon sellers to the most experience 9-figure Amazon brand could benefit from a tool like Samurai Seller.
Click here to try it out (affiliate link).
FAQs About Amazon PPC Automation
What’s Next With Your Amazon PPC?
Click here to get all the Amazon PPC lessons emailed right to your inbox once per week. This will be an actionable lesson every week to take your Amazon PPC to the next level.
If you want support in this Amazon PPC journey, this is where I can help.
How I Can Help Double Your Amazon Sales from Amazon PPC
I’ve set aside time in the next 48 hours to speak to you personally about how you can apply these ideas to your Amazon business starting TODAY.
Whatever your biggest challenge with Amazon PPC, I’ve seen it and know how to overcome it.
We will get on the phone for about 45 minutes and we will work with you to craft a step-by-step game plan to hit your business goals, whether that’s doubling your Amazon sales, increasing keyword rankings, lowering ACoS, or simply just having more love for what you do every single day.
The cost? Absolutely FREE.
But this is not for everybody…
Who This Is For
- You MUST have an incredible brand that you are looking to scale.
- You MUST operate your business with integrity and great values.
- You MUST be willing to take action to transform your Amazon PPC.
- You MUST take accountability for your failures, avoiding excuses for why something can’t be done.
- You MUST be coachable.
Why I’m Doing This
I do this because I love helping others attain the financial abundance that we have achieved with our business.
Plus, I know that you might want help transforming your business (it’s tough going it alone!). If so, we can discuss it and see if it’s a good fit for both of us. And if it’s not, I will point you in the direction that you need.
If you’re willing to:
1. Take Action
2. Be Vulnerable
3. Be Coachable
Then I would love to chat with you…
This is what I love helping people do. This is why I was put here on this Earth… to help people like you grow their Amazon business.
I can show you, step-by-step, how to create efficient, scalable Amazon ads and free yourself from working hours on your ads and second guessing yourself.
All you need to do is book a call here: https://www.growto1million.com
Every day that goes by is more time wasted. Every moment you hesitate is you settling for being less than you were born to be. Let me help you turn your dreams into a reality.
Your future is waiting for you.
Talk soon,
![How To Add an Authorized User to Amazon FBA Seller Central [W/ VIDEO]](https://salesfunnelhq.com/wp-content/uploads/2020/01/How-to-Add-an-Authorized-User-in-Amazon.png)