It is FINALLY time to set up your first Amazon PPC Campaign! If you have been following along in our 8-week journey to scaling your Amazon PPC and doubling your Amazon PPC, you have learned how to track and measure your results, research your competitors, simplify your Amazon keyword research, and make sure your Amazon listing is optimized.
In this article we are moving on to step five, which is setting up your first Amazon PPC campaign. I would highly recommend going back and reading/watching the previous examples if this is your first time joining us, as they will all play a role in setting up your first Amazon PPC campaign. Or, you can check out my FREE 8-week Amazon PPC Masterclass by clicking here.
How to Set Up Your Amazon PPC Campaign
The goal with an initial campaign is to start discovering keywords that will sell your product, therefore increasing rankings, increasing profits, and lowering your overall cost per advertising. If you have the budget and feel like blowing a TON of money, then I would recommend going after the highest search terms possible and bullying your way to the top…
I’m kidding.
This is extremely challenging as Amazon rewards those listings that have a high conversion rate, a long sales history, and that make them a lot of money. For you to be considered in this conversation, you should start by going after the keywords that no one else is going after. The mid to long-tail keywords.
As discussed in our keyword research article, a mid to long-tail keyword in Google means a phrase of three or more words that have search volume. Whereas in Amazon, this means a phrase of any amount of words related to the main keyword that you are going after that has a LOWER search volume.
Most people are going after the super-competitive search terms with a high amount of search volume, but if you go after the lower search volume search terms, you will organically move up in the more competitive search terms.
Let’s jump in to how to set up your first Amazon PPC Campaign.
1. Pull Up Your Keyword Research Document From the Previous Step
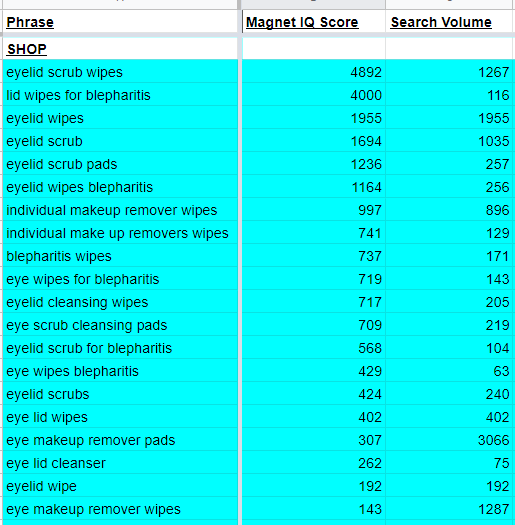
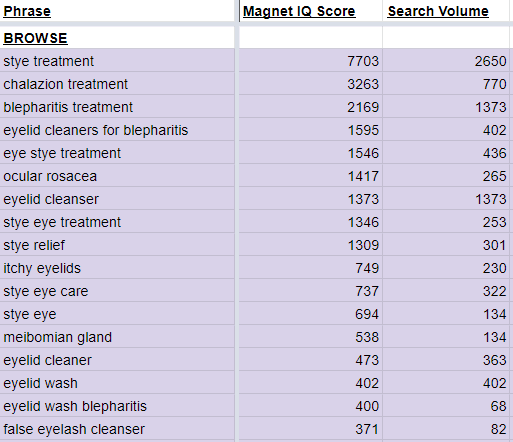
Let’s start by pulling up your keyword research that we did in our previous example, eyelid wipes (keyword research process on our eyelid wipes is here), We will look at both the SHOP and the BROWSE category for these keywords which we already have separated.
The goal of these shop and browse campaigns is to discover search terms that convert to a lot of sales at a little cost.
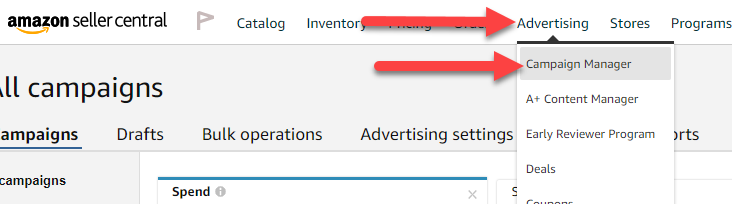
2. Log In To Campaign Manager
If you are already running Amazon PPC, the next few steps should be pretty easy for you. Actually, this whole step is pretty easy as it is mostly implementing all the difficult work that you have done in the previous four steps.
Hover over Advertising at the top of the page and click on the Campaign Manager subheading.
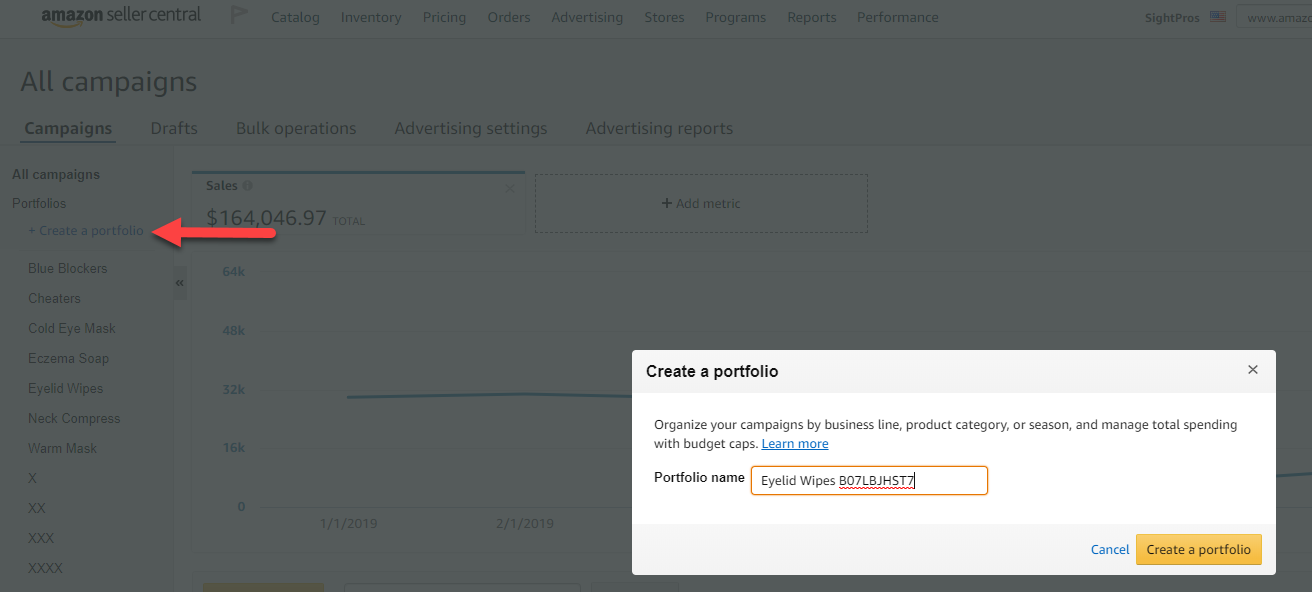
3. Create a New Portfolio
After logging in to campaign manager inside your seller central account, you will want to create a portfolio. A portfolio is a very simple way to keep all the campaigns you have running for a product organized.
The nice thing about this strategy is you will only have one campaign running for a while as you start to scale and accumulate data (more to come in a later step).
Name this portfolio the same way you would name your campaigns: PRODUCT NAME ASIN
In our example: Eyelid Wipes B07LBJHST7
4. Create Your Campaign
Once we have created the portfolio, we want to click it to head into it. There shouldn’t be anything in it right now.
Then click Create Campaign

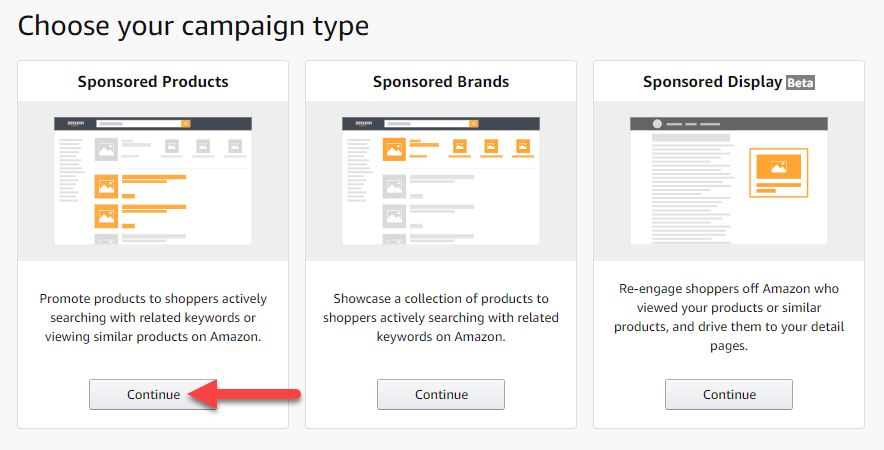
5. Choose Sponsored Products
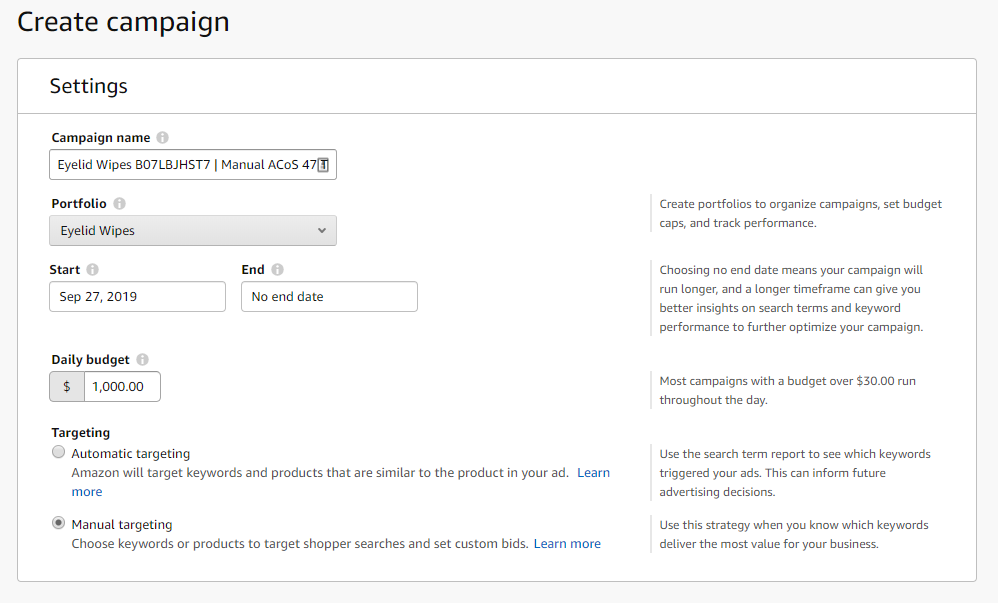
6. Choose Campaign Settings
The campaign name is one of the most varied things that I see when I take over a client’s account. I believe in one thing and one thing only when it comes to campaign names (and ad group names, as you will see later), MAKE SURE IT MAKES SENSE.
I don’t want to be looking up what my codes and initials are for each campaign. Also, I don’t memorize SKUs or ASINs, nor do I want to take the time to do that.
My campaign naming structure is simple PRODUCT NAME ASIN | CAMPAIGN TYPE ACOS TARGET
Here is the example: Eyelid Wipes B07LBJHST7 | Manual ACoS 47
This simply means this campaign is for my eyelid wipes, it is manual, and our target/breakeven ACoS, which we calculated in step one is 47%,
That’s it! Easy to understand and implement.
The other settings are easy. Make sure it is in the correct portfolio, start date whenever you want to start it, no end date, and pick manual targeting.
The budget is completely up to you based on what kind of cash flow you currently have in your business and how aggressive you want to be. I like to start a little more aggressive depending on the amount of reviews I have for a product. I would recommend a minimum of $100 for a conservative approach and $1000 if you wish to be more aggressive.
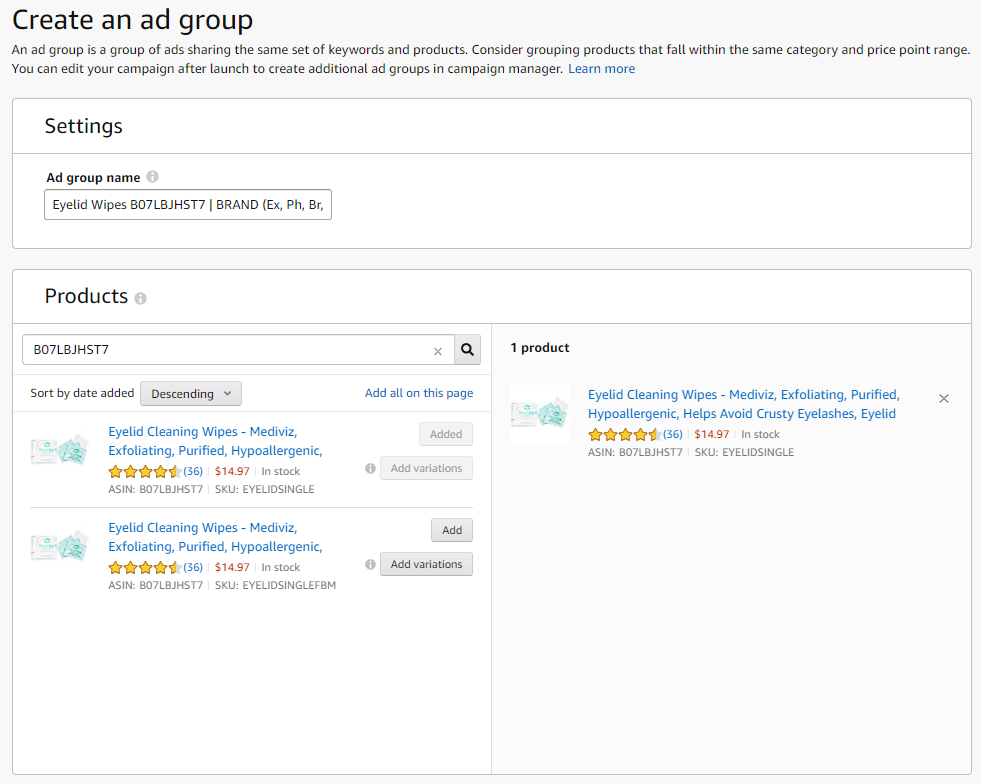
7. Ad Group Settings and Product Selection
Ad group names are similar to that of campaign names. I want them to make sense as to what I am doing in that particular ad group.
PRODUCT NAME ASIN | AD GROUP INFORMATION
Here are the three that we will be setting up in this step:
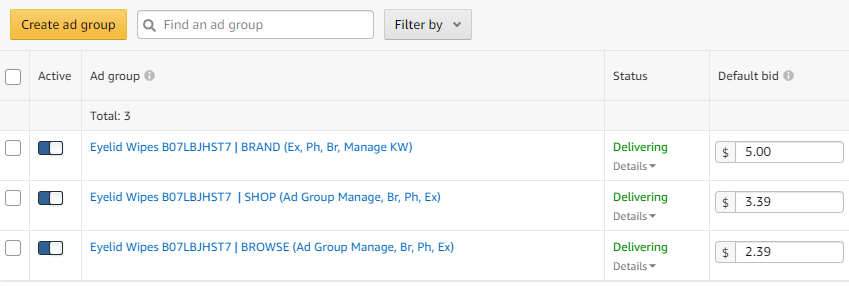
Eyelid Wipes B07LBJHST7 | BRAND (Ex, Ph, Br, Manage KW)
Eyelid Wipes B07LBJHST7 | SHOP (Specific Product, Ad Group Manage, Br, Ph, Ex)
Eyelid Wipes B07LBJHST7 | BROWSE (Broad KWs, Ad Group Manage, Br, Ph, Ex)
Also add your product in as the targeting product.
We will go over what each of these are and how to use them in just a little bit.
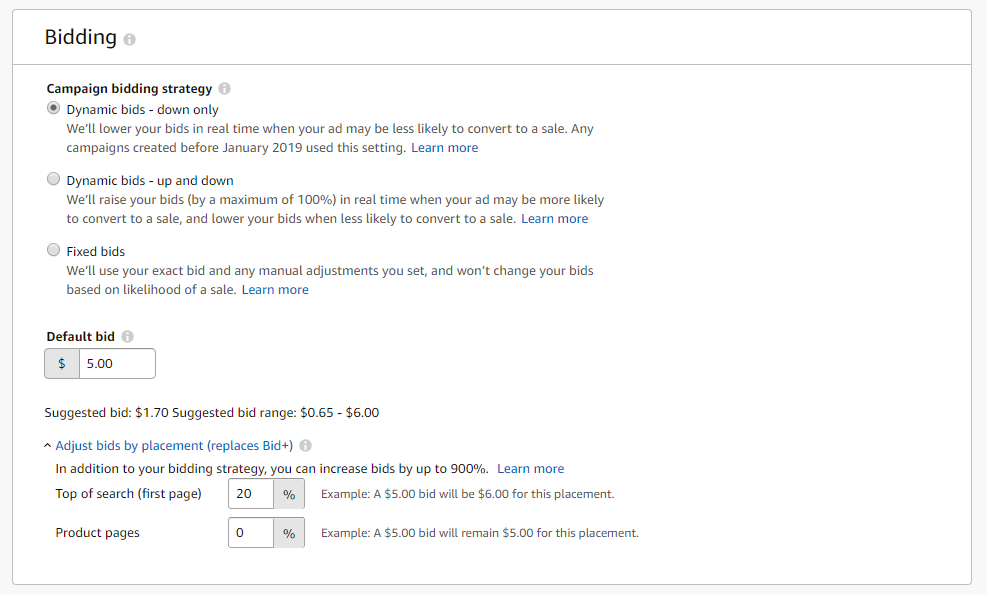
8. Campaign Bidding Strategy
I have done some extensive testing on whether to use Dynamic bids – down only, dynamic bids – up and down, and fixed bids. By a landslide, the best for us has been dynamic bids – down only. Do NOT even test the others as I have tested thousands of dollars on these with no success.
Ignore the default bid for now. In the picture you will see $5.00, because this is our Brand ad group and we always want to protect our brand name keywords.
The blue Adjust bids by placement should be clicked to open it up and choose to increase your top of search (first page) by 20% (or more to be more aggressive). Keep product pages at 0%
Difference in Ad Groups – Brand, Browse, Shop
BRAND Ad Group
Your branded keywords are the number one thing that must be in a campaign to start.
This is your brand name. Even if you are unknown now, you will not be in the future. Start bidding and bidding high on your own brand name. As you become more well known, these will be your cheapest sales and you want to make sure no one takes that from you.
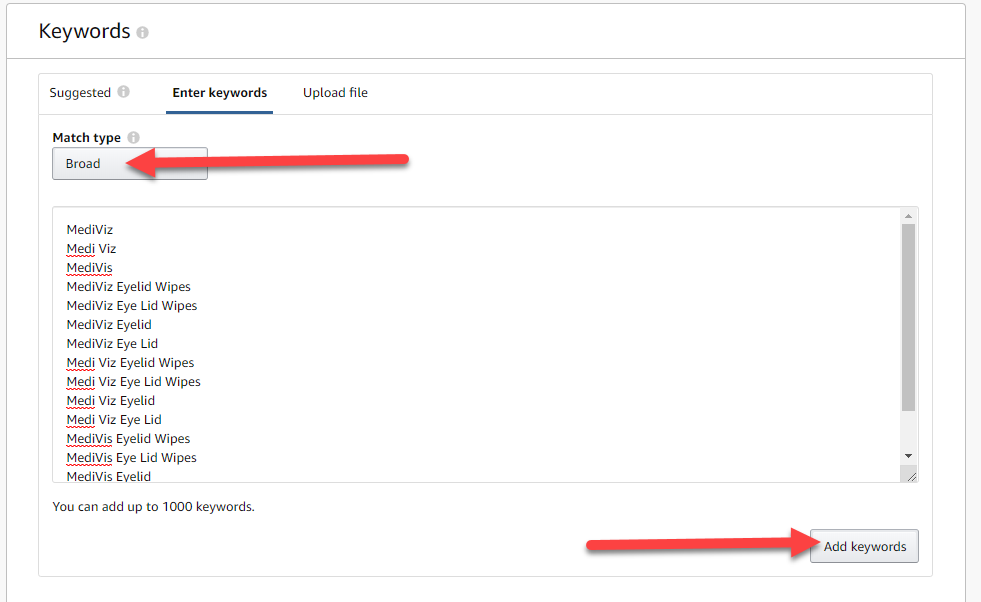
The example in this case is MediViz. We also want to bid on any misspellings that might occur like Medi Viz, MediVis, etc.
Finally, take your best keywords that are converting and add your brand name to the front of them.
Here is the initial list for our eyelid wipes:
MediViz
Medi Viz
MediVis
MediViz Eyelid Wipes
MediViz Eye Lid Wipes
MediViz Eyelid
MediViz Eye Lid
Medi Viz Eyelid Wipes
Medi Viz Eye Lid Wipes
Medi Viz Eyelid
Medi Viz Eye Lid
MediVis Eyelid Wipes
MediVis Eye Lid Wipes
MediVis Eyelid
MediVis Eye Lid
The default bid that I like to use for my branded keyword is usually anywhere from $5.00 to $10.00 CPC depending on how aggressive you want to be. You will NOT likely spend this much as no one else will be bidding on these words. Most likely you will pay less than $0.25
We name this by telling us what we will be doing inside this particular ad group.
Eyelid Wipes B07LBJHST7 | BRAND (Ex, Ph, Br, Manage KW)
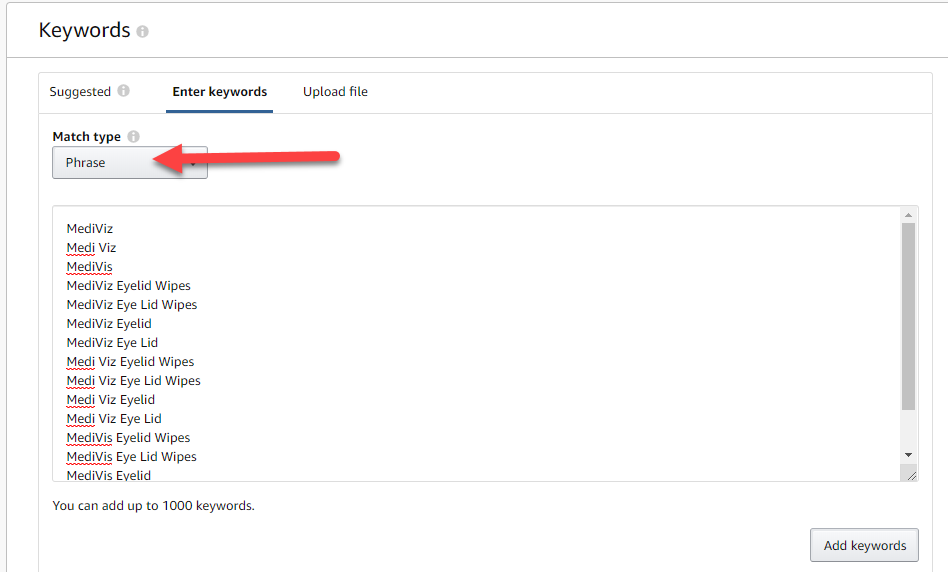
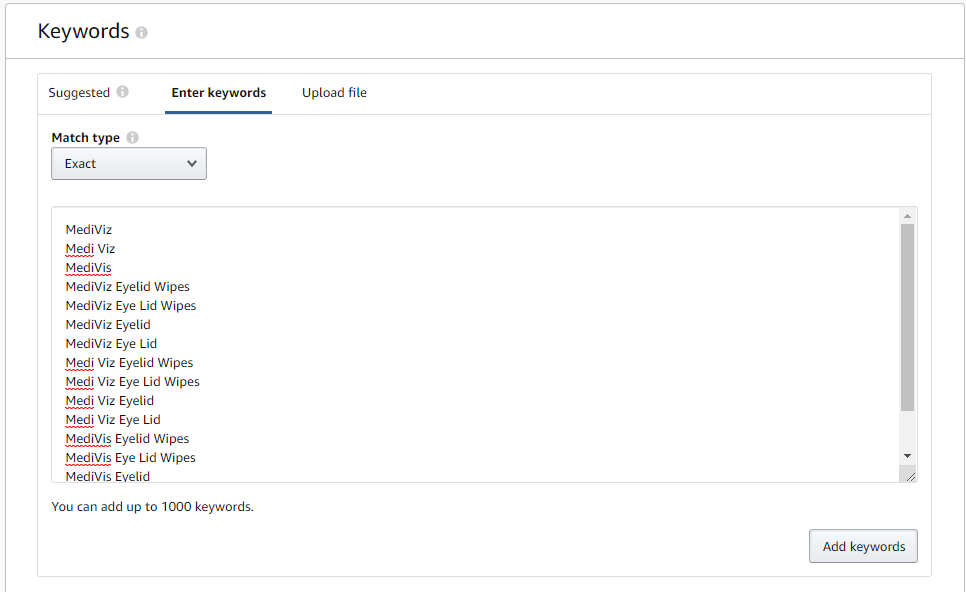
This means that all the branded words above will be put in the ad group as exact match type, broad match type, AND phrase match type.
Copy and paste your list in for broad first, then click add keywords. Repeat for Phrase and Exact match type.
Then hit Launch Campaign at the bottom.
The Manage KW part of the ad group name means that we manage and change each individual keyword inside the campaign individually. This will make more sense once we go over SHOP and BROWSE ad groups next.

SHOP Ad Group
If you remember from the keyword research step, the SHOP ad group is designed with more specific buy oriented keywords. This means that the shopper that types these keywords in, or anything close to them, is more likely to purchase than they are with the BROWSE keywords.
What does this mean?
This means that we want to be more aggressive with these keywords and bid more than we would with the browse keywords. These keywords are designed to get you rank and sales.
You can just start out with the first 5-10 on your list if you want to save money or add all the keywords if you have a larger budget. Just take note that the more keywords you add, the more likely you are to discover profitable keywords AND the higher likelihood that you will spend more… MUCH MORE.
We will be putting in each of these keywords as broad match type, phrase match type, and exact match type.
So, what do we bid? Start your CPC about $0.60 higher than the highest suggested bid.
After you put your keywords in that you will be bidding for, you will take a look at all the keywords’ suggested bids from Amazon. Then you want to bid around $0.60 higher than the HIGHEST suggested bid. This is a VERY aggressive approach and you may want to just choose the highest suggested bid instead, if you want to be more conservative.
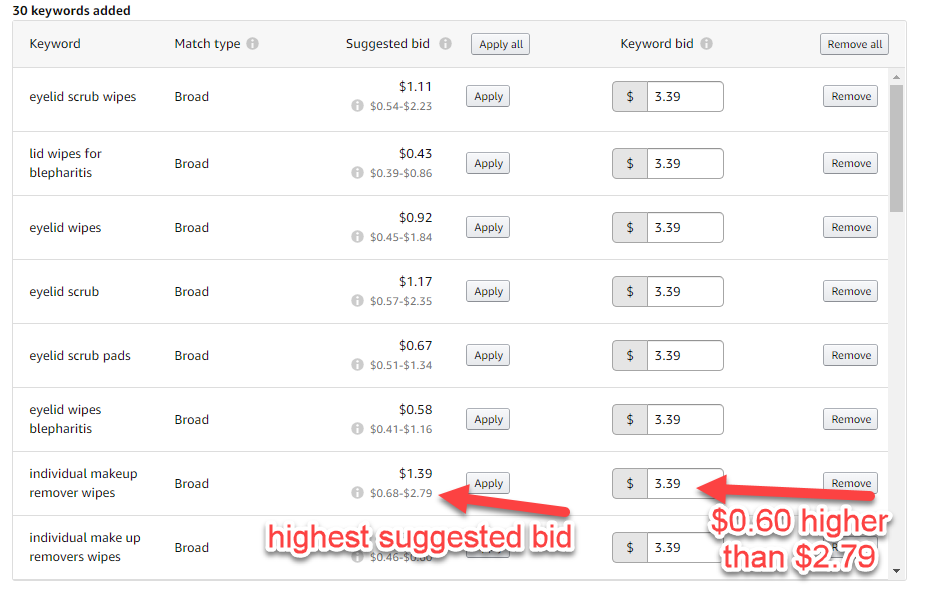
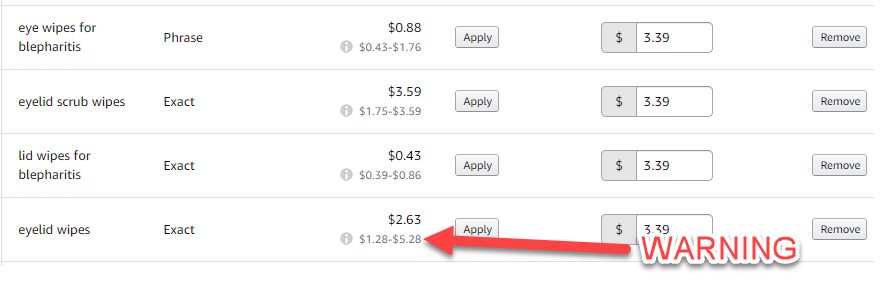
WARNING: There will be anomalies in the suggested bid. YOU SHOULD IGNORE THESE.
Summary and example of the SHOP ad group name
This will be a brand new ad group inside our existing manual campaign that contains our BRAND ad group.
NAME: Eyelid Wipes B07LBJHST7 | SHOP (Ad Group Manage, Br, Ph, Ex)
- Starting Bid = about $0.60 higher than the highest suggested big
- Match Type = Broad, Phrase, and Exact
SIDE NOTE ON THE SHOP AD GROUP
This is the main discovery ad group in your campaign. This is where we will test new keywords every month after we analyze the search term report (coming in a later step). You will learn more about SCALE ad groups in a future step, but wanted to introduce a concept here. Whenever we find a customer search term that we want to add to the SCALE ad group (meaning it is very profitable), then we want to ALSO add that same customer search term to the SHOP ad group as broad and phrase match to discover more search terms that are profitable.
BROWSE Ad Group
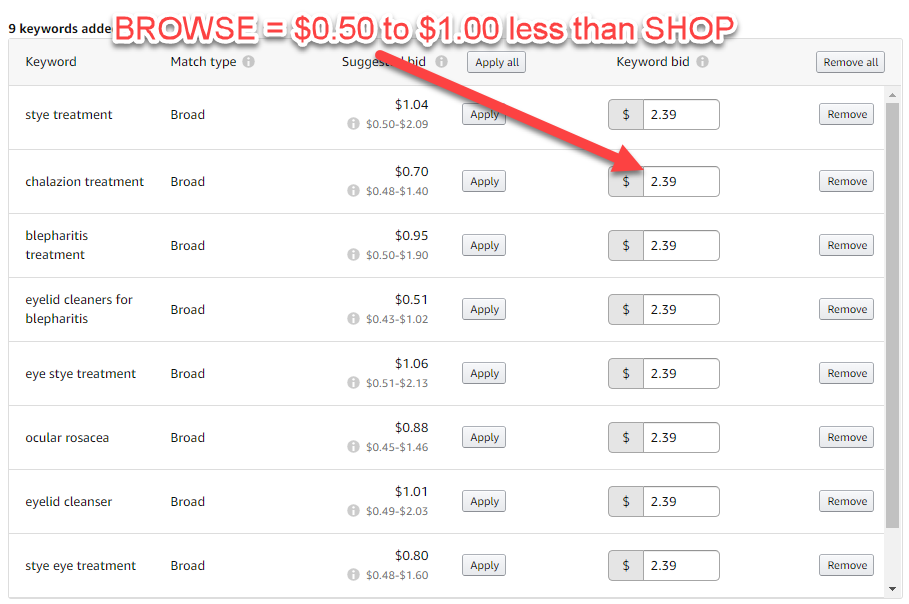
Create another ad group, which will contain our browse keywords. Since customers shopping for these keywords are most likely “just browsing” for a solution with no real intention to purchase anything, we want to bid about $0.50 to $1.00 BELOW the SHOP ad group CPC.
We will also be putting each of these keywords in as broad match type, phrase match type, and exact match type.
Summary and example of the BROWSE ad group name
This will be a brand new ad group inside our existing manual campaign that contains our BRAND ad group and SHOP ad group.
NAME: Eyelid Wipes B07LBJHST7 | BROWSE (Ad Group Manage, Br, Ph, Ex)
- Starting Bid = $0.50 to $1.00 BELOW the SHOP ad group CPC
- Match Type = Broad, Phrase, and Exact
This is what your campaign should look like after you are done. As a reminder, this is all in the SAME campaign as different ad groups.
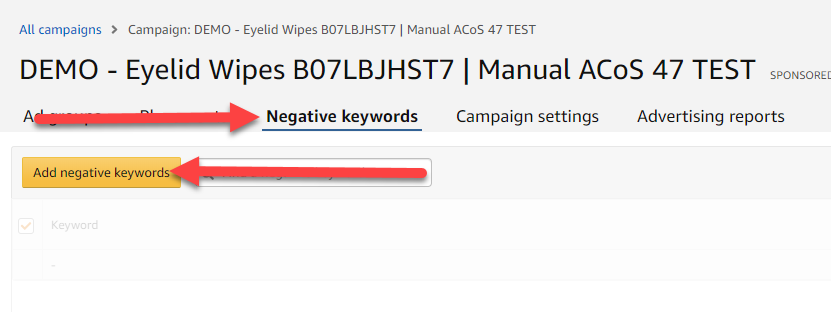
9. Add Your Negative Keywords
Open up your campaign again and click on Negative keywords at the campaign level (look for Campaign settings as the option to the right, as this will tell you that you are at the campaign level).
Then click Add negative keywords.
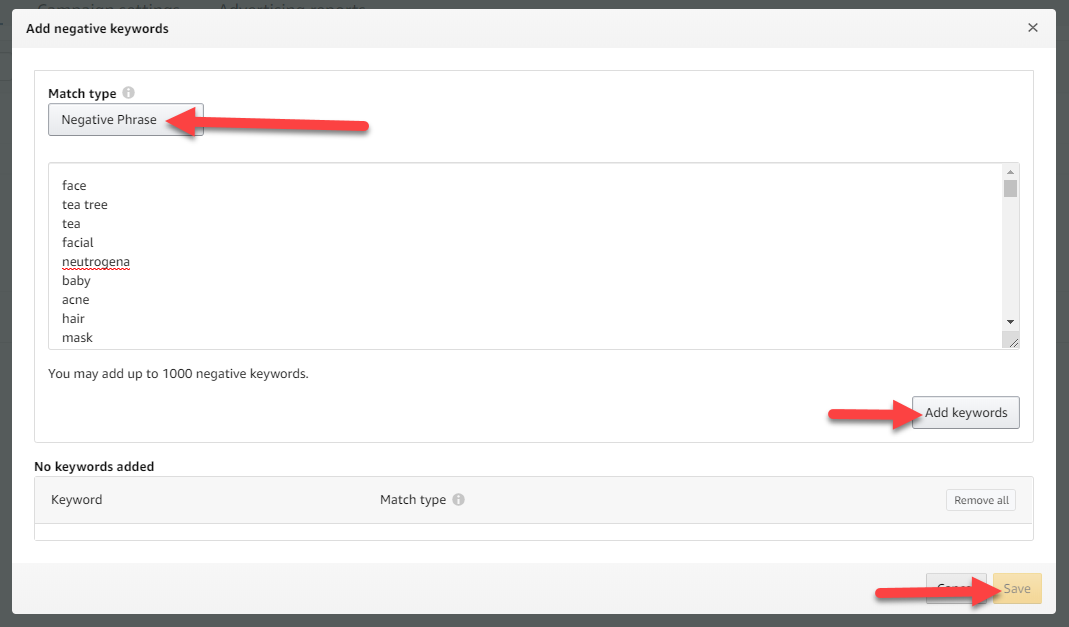
Go back to the list of negative keywords you created while doing competitive analysis and keyword research.
Add all your keywords in as a Negative Phrase match and click Add keywords, then Save.
10. Pausing Your Keywords
Since we are being aggressive in our keyword bids in the SHOP and BROWSE ad groups we will want to watch them closely to shut off the losers and keep the winners. We check new campaigns about three times per week, whereas more established ad groups, we only check one to two times per week. We go by 2 simple rules:
- Pause all keywords that have more than 10 clicks withOUT any sales
- Pause all keywords that are greater than your breakeven ACoS (which you calculated here)
After pausing, we then see if we can increase or decrease our CPC based on where our ACoS sits with all the enabled keywords remaining.
If ACoS is greater than our target, we need to lower all the keywords bids by about 10-20% (remember BROWSE and SHOP ad groups are Ad Group Managed bids, read more below). If the ACoS is less than our target, we should increase our CPC by about 10-20% to be more aggressive and discover new search terms (as shown in the video).
Ad Group Manage vs Keyword Manage Bids Inside Your Amazon PPC Campaigns
This is an incredibly simple concept that can be very hard for some to execute and stick with it. The reason is because we make emotional decisions on managing Amazon PPC based on what WE want to rank on and not what the customer is showing us they’re buying from. Don’t be emotional, be logical. Amazon PPC is data, math, and a little art.
Let’s start out with the easier concept, managing keyword bids. This is what most people do. We go in and analyze each keyword and either turn up the bids if they are doing well or turn them down if they aren’t. The only example above that will have this is our BRAND ad group and in future steps will be COMPETITOR and BUY ad groups.
We will be doing specific calculations to know exactly what to bid on each keyword to hit our target/breakeven ACoS.
Ad group managing bids is a little different concept that is easy, but harder to execute due to that emotional element. Regardless of what the keyword is, ALL the keywords will have the SAME bid. This is the ad groups of an Ad Group Manage bid group like SHOP, BROWSE, and SCALE.
For the above examples ALL the keywords in the SHOP campaign will be $3.39 and ALL the keywords in the BROWSE campaign will be $2.39. We don’t change this initially, but rather pause keywords if they don’t meet our criteria of performance, which we will go over in the next step.
This is what I consider to be one of the easier steps in our 8-week Amazon PPC Masterclass. Now we just need to sit and wait for the data to accumulate (kind of). As the data is accumulating, we want to make sure that we don’t spend too much on some of the keywords that we are bidding on.
In the next step I will be discussing how to monitor your campaigns and NOT freak out! I will show you exactly what to do and how often to do it.
What’s Next With Your Amazon PPC?
This is only step 5 in your new Amazon PPC Strategy. Click here to get all the Amazon PPC lessons emailed right to your inbox once per week. This will be an actionable lesson every week to take your Amazon PPC to the next level.
If you want support in this Amazon PPC journey, this is where I can help.
How I Can Help Double Your Amazon Sales from Amazon PPC
I’ve set aside time in the next 48 hours to speak to you personally about how you can apply these ideas to your Amazon business starting TODAY.
Whatever your biggest challenge with Amazon PPC, I’ve seen it and know how to overcome it.
We will get on the phone for about 45 minutes and we will work with you to craft a step-by-step game plan to hit your business goals, whether that’s doubling your Amazon sales, increasing keyword rankings, lowering ACoS, or simply just having more love for what you do every single day.
The cost? Absolutely FREE.
But this is not for everybody…
Who This Is For
- You MUST have an incredible brand that you are looking to scale.
- You MUST operate your business with integrity and great values.
- You MUST be willing to take action to transform your Amazon PPC.
- You MUST take accountability for your failures, avoiding excuses for why something can’t be done.
- You MUST be coachable.
Why I’m Doing This
I do this because I love helping others attain the financial abundance that we have achieved with our business.
Plus, I know that you might want help transforming your business (it’s tough going it alone!). If so, we can discuss it and see if it’s a good fit for both of us. And if it’s not, I will point you in the direction that you need.
If you’re willing to:
1. Take Action
2. Be Vulnerable
3. Be Coachable
Then I would love to chat with you…
This is what I love helping people do. This is why I was put here on this Earth… to help people like you grow their Amazon business.
I can show you, step-by-step, how to create efficient, scalable Amazon ads and free yourself from working hours on your ads and second guessing yourself.
Every day that goes by is more time wasted. Every moment you hesitate is you settling for being less than you were born to be. Let me help you turn your dreams into a reality.
Your future is waiting for you.
Talk soon,
![Amazon FBA Sellers Don’t Get Shutdown Doing This [BREAKING NEWS]](https://salesfunnelhq.com/wp-content/uploads/2019/12/Amazon-FBA-Sellers-Avoid-Suspension-Changes.png)
![Should I Hire an Amazon PPC Agency? [Amazon PPC Agency Pricing]](https://salesfunnelhq.com/wp-content/uploads/2020/06/Should-You-Hire-an-Amazon-PPC-Agency-e1655322636697.jpg)